///

SuperPath® total hip replacement

Learn the SuperPath® total hip replacement surgical technique with step by step instructions on OrthOracle. Our e-learning platform contains high resolution images and a certified CME of the SuperPath® total hip replacement surgical procedure.
The SuperPath® approach for total hip replacement is a muscle sparing approach based on 2 previous techniques, PATH® and SuperCap®. The name SuperPath® is an abbreviation of the anatomical basis of the approach: SupraCapsular Percutaneous Assisted Total Hip. Although it is classed in the family of Superior approaches to the hip, on closer inspection, the approach is the top end of a standard ‘Posterior’ approach using the interval between Piriformis at the back and Gluteus Minimus at the front. Its main benefits are of complete muscle and tendon sparing in its purest form, whilst having the extensibility of the posterior approach at any point during the procedure. This allows both a safe learning curve and a wider range of indications compared to other ‘Muscle sparing approaches’.
It has been proven that patients have less post operative pain and a shorter length of stay with the technique. (reference 1 and 2) Early functional goals are reached faster including, time to coming off crutches, return to driving and return to work. (reference 3)
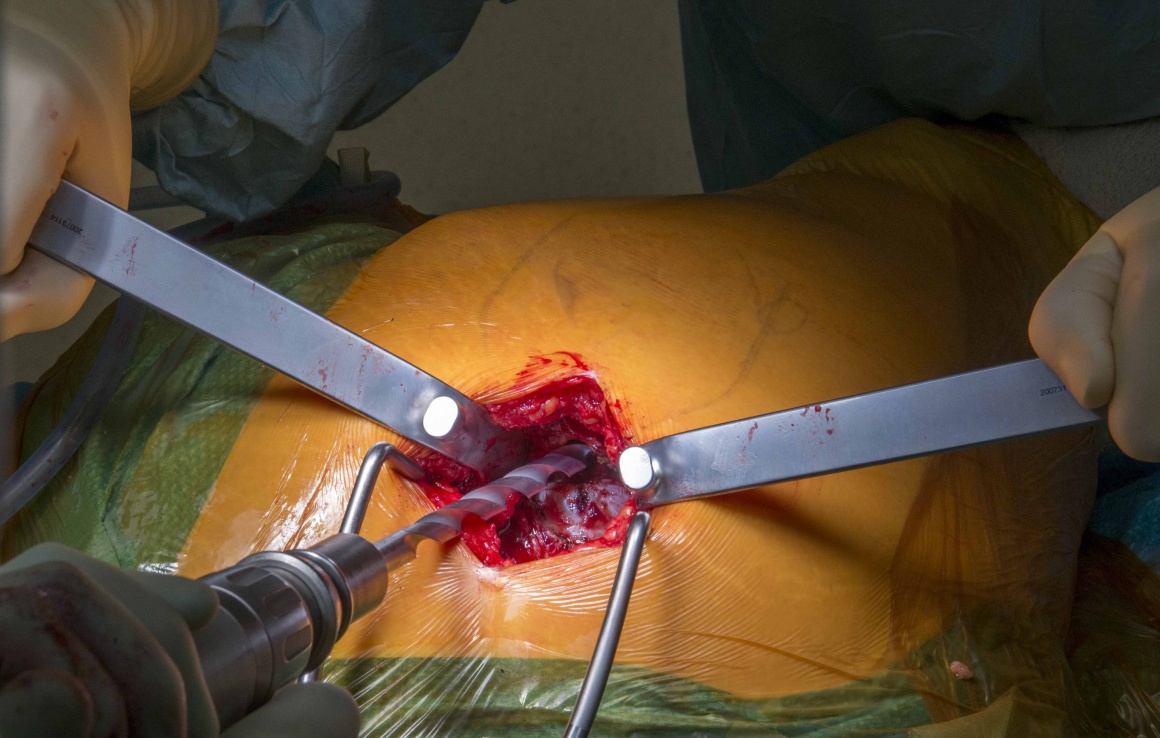
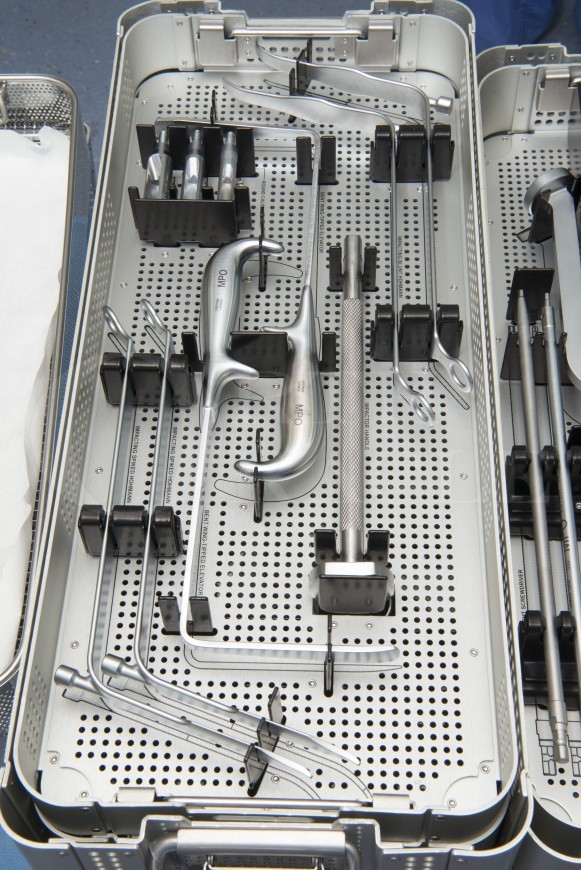
The technique is based around a set of modified instruments that allow direct access to the femur from above and direct access to the acetabulum through a specially designed portal. The use of the portal allows more soft tissue preservation than other superior approaches that rely on offset reamers to access the socket. The instruments come in 2 simple trays that are easy for nursing staff to follow and no additional table attachments are required.

INDICATIONS
The indications are that of any standard Total Hip Replacement. Obviously conservative measures should be exhausted and every case discussed with the patient regarding the balance between benefits of pain relief and improved function, balanced against the risks of surgery.
At present the technique is most suited to the use of uncemented implants. Although technically the approach could be adopted for cemented implants, the surgical instruments are not currently available to assist this. Uncemented implants are available in several philosophies: Short stem, Blade stem, Fully coated tapered stem and canal filling stem. All are available in both modular neck and monolithic stems.
The common difficulties encountered with other tissue sparing or minimally invasive approaches regarding obesity and muscular patients are not as relevant to this technique due to the ability to easily extend.

SYMPTOMS & EXAMINATION
These are the same as for any hip replacement patient with groin pain, anterior thigh pain and buttock pain being the most common. These can initially be treated conservatively but common symptoms for patients at a stage requiring hip replacement include:
Night pain, increased analgesia requirements, reduced walking distance and reduced range of movement. This is often seen with difficulty getting down to feet to put on shoes, difficulty getting in and out of a car and ascending stairs.
Examination findings are of stiffness (including fixed flexion deformity, reduced flexion and particularly internal rotation), joint irritability and muscle weakness (seen on Trendelenburg testing or manifest as a limp). Leg length discrepancy is important to note so it can be accurately corrected during surgery.
IMAGING
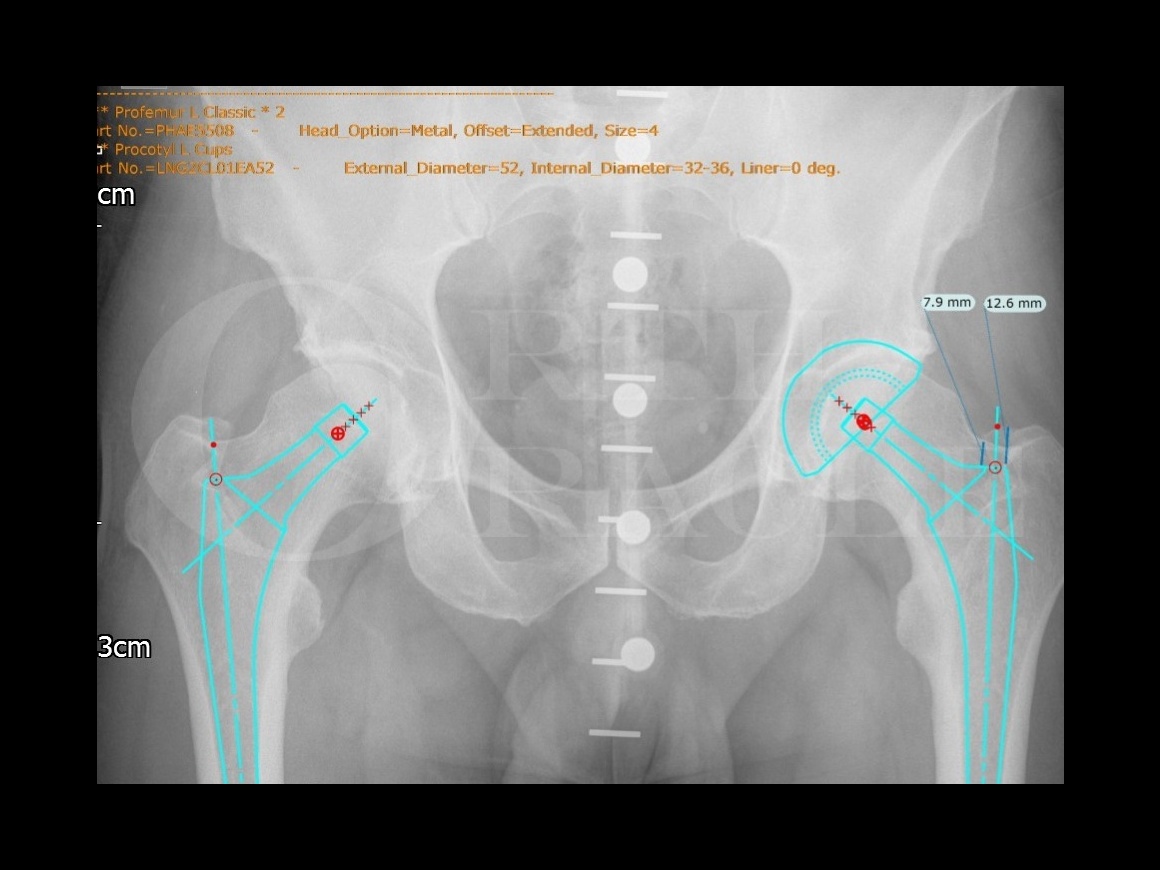
A pre-operative x-ray with scaling marker is essential to make a pre-operative plan. Once the implants are positioned in a standard fashion (to reproduce length and offset) the distance of the femoral stem from the tip of the greater trochanter is measured.
ALTERNATIVE OPERATIVE TREATMENT
This approach can be easily extended by releasing the short external rotators and posterior capsule in a sequential fashion until the approach is the same as a full posterior approach
CONTRAINDICATIONS
The contraindications for the approach are the same as the absolute contraindications for any total hip replacement (presence of infection, bone tumours, severe muscle of nerve dysfunction of the lower limb, bone stock deficiency or severe medical comorbidity)
Relative contraindications depend on the level of surgeon experience but, as the approach can easily be extended by releasing the posterior structures sequentially until you have a full posterior approach, it is possible to start any case requiring THR using this approach. Although initially obesity and very muscular patients are more difficult to treat, as experience is gained, I personally feel that the approach is as easy if not easier than a standard posterior approach.

Author: Mr Michael Cronin BSc, MBBS, FRCS (Tr & Orth)
Institution : Morriston Hospital, Swansea, UK.

The patient is set up as for any Total Hip Replacement. Local policies should be followed for DVT prophylaxis, Antibiotics and Tranexamic acid.
Anaesthetic is again down to surgeon/anaesthetist preference. Initially you should be aware that it may take additional time to perform the procedure but again the approach can always be extended if necessary to negate this. It has been proven that surgical time improves quickly during the learning curve. ( reference 4)
The patient is positioned in a standard lateral decubitus position using the surgeons preference of hip supports (my preference is a double support on both ASIS and a single posterior support on the sacrum). Care must be taken to allow a full range of movement including deep flexion.
The patient can be positioned slightly more anterior on the operating table than with a standard posterior approach – this allows the operated leg to be adducted over the edge of the table if needed.
The foot is raised during the operation either on a dressed mayo table (my preference as it can be adjusted for height) or a foam bolster.
Standard basic hip instruments are used along with SuperPath® specific trays.

A Pre-operative planning X-ray is taken ensuring scaling markers are present to allow accurate scaling of the image (Here the Kingmark system is used with separate markers behind and in front of the patient to increase accuracy)
The implants are dropped onto the template as standard:- The acetabular component should be placed at the level of the tear-drop, expanded until it reached the diameter of the socket and then medialised as appropriate (in general, I ream to the true floor unless I am trying to lateralise acetabular offset to improve overall offset in certain cases). The femoral component is then placed in line with the canal and at a height appropriate to reproduce leg length. The size is then increased to fill the canal as appropriate for the stem philosophy used. Finally adjustments are made to the stem offset to reproduce length and offset compared to the contralateral hip.
Once all of this ‘standard’ templating has been undertaken several new measurements are made:- Rather than examine the height of the stem above the lesser trochanter (and base our neck cut on this) measurements are made down from the tip of the Greater Trochanter to the shoulder of the stem (in this case 12.6mm) and from the piriform fossa to the shoulder of the stem (in this case 7.9mm) These measurements will be checked intra-operatively to ensure accurate reproduction of leg length (in conjunction with intra-operative trialing)

Specially created instruments include Langenbeck retractors (1), blunt (2)and pointed (3) Hohmann retractors and 2 self retainers.
The second tray contains instruments specially designed to enable ‘in-line’ femoral preparation and acetabular preparation through a portal.

I personally have a tray of extra instruments available which includes spares of the instruments essential to complete the procedure as well as some modified instruments which I have found make the technique easier.

The round calcar punch is used to create the slot in the head and neck of femur, to create room for femoral broaching.

The curved rasp can be used as an extra instrument to lateralise during the femoral preparation

The curved neck holding forceps is angled to be able to place the trial neck in the rasp

The leg is prepared and draped in a standard fashion. The skin is left exposed from the iliac crest above to the mid thigh below. This allows for potential extension of the wound as necessary. I personally use Ioban style drapes on the exposed skin and use a skin marker on top of this drape.
My personal preference is for a well fixed lateral decubitus position using a single posterior bolster on the lumbar-sacral junction and a ‘two-pronged’ bolster pressing on the two ASIS. This rigid position aids acetabular cup placement but I also rely on the anatomical landmarks around the acetabulum intra-operatively

The leg is moved into the ‘Home’ position where it stays for the majority of the operation. This involves 60-70 degrees of flexion (more than a standard approach). The foot is lifted on a mayo table to allow adduction and 20-30 degrees of internal rotation.
In this home position the greater trochanter (GT) is delivered into its most prominent position, the incision allows a straight line preparation of the femur and the femoral anteversion can be measured using the tibia as a goniometer.

The greater trochanter(GT) is marked on the skin and the incision marked started from the tip of the GT proximally for 5-7cm. It is line with the centre of the GT (can drift slightly posterior but NOT anterior) and is in line with the femoral shaft, aiming for the knee (not curved).
I often mark a dotted extension of this line down the femoral shaft in case of need to extend. Interestingly, if the leg is brought back into a more traditional extended position, the incision now looks very much like the classical curved posterior approach incision

The skin incision and deeper preparation progress in line with the femur. It is important to check that you are not drifting off the back of the femur or not progressing in-line towards the tip of the GT and drifting high onto the acetabular rim (this becomes increasingly important as the patient becomes more obese).

The incision is made through skin and fat to expose the fascia. The fascia can be cleared using a cobb elevator allowing for easy closure at the end of the procedure.

A finger can be used to confirm the position of the tip of the GT before incising the fascia.

The fascia is incised in line with the skin incision. It should not be cut distal to the tip of the GT to preserve the true Fascia Lata, only splitting it over the Gluteus Maximus muscle. This is the first important part of soft tissue preservation as the true fascia provides a stabilising force during walking and preserving it could also help to reduce post operative pain.
Once through the fascia, the fibres of gluteus maximus are split in line with blunt dissection. This can sometimes be aided by using the Langenbeck retractors.

Once through the fibres of gluteus maximus the bursa over the posterior edge of gluteus medius is easily identified by the ‘blush’ of fat (a common sight for a posterior approach surgeon). this bursa is incised over the posterior border of medius.
A finger is then used again to palpate the piriformis tendon on the superior capsule as it disappears under medius. This is much easier to do by palpation than sight initially.

The soft tissue is then incised along the superior border of piriformis to allow it to be freed off the capsule using the cobb elevator (The photo shows a finger just above piriformis before the Cobb is used)

The Cobb elevator is replaced with the blunt Hohmann retractor. The retractor is now seen lying around the back of the femoral neck, between the capsule and the short rotators.
To decrease soft tissue tension it is recommended to lift the knee…..this will facilitate easier positioning of the blunt Hohmann.

In a similar manner, the gluteus minimus is elevated off the capsule using the cobb and then replaced with the blunt Hohmann. This is now around the front of the femoral neck between the capsule and the glutei.

The capsule is now incised in line with the femoral neck. This straight line capsulotomy needs to progress from 1cm onto the rim of the acetabulum, up to the inside of the GT. Staying slightly anterior reduces the risk of inadvertently cutting the Piriformis tendon.
If the leg does not fall into internal rotation at the start of the case despite the foot being raised on the mayo table, this may be a sign that the Piriformis requires release. This can either be released and tagged outside the capsule or my personal preference is to release it with the capsule from the ‘inside-out’. The advantage of this technique is that capsular closure at the end brings piriformis back into its original position without having to reattach it in isolation.
The capsule is opened using diathermy to reduce the bleeding from the retinacular vessels.

Using the Cobb elevator can aid positioning of the the Hohmann retractors inside the capsule and around the femoral neck.
Throughout the exposure, the only anatomical structure that could be at risk would be the Sciatic nerve on the postero-superior acetabular wall. That is why it is important to confirm the position of the femoral neck and acetabular rim during preparation. In an obese patient if you progress vertically rather than in line with the femur you can end up higher on the pelvis than anticipated

The self-retaining retractor (Deep Romanelli) is placed at the superior end of the wound on the rim of the acetabulum in an extra-capsular position. The superior femoral head and neck are now fully visible and palpated to assess the centre of the neck.
The approach to this stage is equivalent to the exposure for a femoral nailing. It has just been performed in a much more elegant and anatomical fashion!

An entry drill is used in the centre of the femoral neck to perforate the femoral canal. Lowering your hand will help you to shoot straight down the canal.

The cylindrical osteotome is used to cut a slot in the femoral head and neck to allow access for the femoral rasps.
It is important to orientate this slot correctly to obtain the correct anteversion of the femoral component. The natural femoral head and neck can be used as a guide as well as the position of the tibia as a ‘goniometer’. If the slot in the femoral neck is vertical then the angle of the tibia measured from the horizontal of the operating table is the angle of anteversion.
I aim for an anterversion angle on the femoral side of between 10 and 30 degrees partially depending on the patients natural anatomy.

The calcar currete can be used to increase the cavity until it is large enough to accept the smallest rasp

A clear view is obtained of the rim of the socket with the femoral head still in situ. The slot in the femur will now allow the first rasp to be placed.

If required, the lateral bone around the inside of the GT can be removed with the powered lateraliser or the curved rasp (my preference as it is more controlled with less bone removed) This step can be thought of as removing the bone we normally remove with the box osteotome at the start of traditional femoral preparation. In this technique the initial drill hole is less ‘lateralised’ due to the angle of preparation

The femoral rasps are placed into the slot cut into the femoral head and neck. They are used as standard inincreasing sizes until stability is achieved and the stem is sunk to the appropriate depth (here the measurement on the rasp handle can be seen)

The depth can be measured off the rasp handle compared to the tip of the GT. Although this is a good guide, the tip of the GT is covered in a variable amount of soft tissue depending on the patients anatomy which needs to be appreciated.
This depth is compared to the pre-operative templating.

The ‘hockey stick’ can be used inside the femoral rasp to reproduce the position of the centre of rotation using a short head and short neck combination. This can be compared against the patients natural femoral head which is still in-situ.
In front of the ‘hockey stick’ the shoulder of the neck (piriform fossa) can be seen. The depth of the shoulder of the rasp below this is also compared to the pre-operative templating

X-ray can be used to check femoral stem position as initially the unusual view can make it difficult to assess the depth of the femoral stem (the usual visual guide of the lesser trochanter is not possible)

The femoral neck is now cut using the rasp still inside the femur as a cutting guide. The cut goes straight across the top of the rasp, pushing initially into the calcar and then cutting forward and backward across the rasp.
My preference is to use a double sided reciprocating saw.

The femoral head is now removed using 2 schanz pins placed in the femoral head. This is the equivalent of removing the femoral head in a hip fracture case using the corkscrew. the Schanz pins have the advantage of 2 points of contact to allow rotation of the head and tearing of the ligamentum teres

The femoral head can now be inspected to assess the length of the neck cut (compared to pre-operative templating) and femoral anteversion

Acetabular exposure now begins by repositioning of the retractors. The initial self-retaining Romanelli retractor is placed again at the superior end of the wound on the rim of the socket in an extra-capsular position. The second self-retainer, the modified Zelpi, is placed inside the capsule opening it in an antero-posterior direction. The capsule is the opened in a medio-lateral direction by placing the curved hook in shoulder of the femoral and an assistant pulling laterally.
Opening this mobile window more in one direction closes it in the other so a balance needs to be obtained.

The acetabular guide is placed in the socket to aim the portal in the correct orientation. The vertical arm of the guide will place the portal in approx. 40 degrees inclination if it is vertical to the patient. The ‘T’ handle will place the portal in approx. 25 degrees ante-version if it is transverse across the patient. The portal is mobile during preparation.

A small stab incision is made just off the back of the femur for the portal to be placed with the pointed trocar. At this stage the leg is brought into extension to allow the sciatic nerve to ‘relax’ and move away from the surgical field.

The portal enters through the capsule just posterior to the calcar aiming at the centre of the socket. This position is important as it allows for accurate reaming of the acetabulum. It can be adjusted (as discussed during a later step) if needed.

Acetabular basket reamers have a ‘hex’ connection to allow the basket to be introduced through the main incision with a ‘key’

The femur is lifted away from the acetabular rim with the hook (shown here in the assistants hand) to allow easy basket placement. The portal can be seen entering the skin and in the appropriate orientation of inclination and anteversion. The portal is mobile but position can be optimised by subtle movements of the leg (extra flexion) or translation of the femur (normally anteriorly) with the black hook

The reamer basket is ‘docked’ with the reamer drive shaft placed through the portal. The direction of reaming can be easily controlled even through the portal. If more anteversion is required, the assistant can help by translating the femur anteriorly using the hook.

The definitive acetabular cup is prepared by placing the screw-in adaptor into the shell. This has a ‘hex’ connection to allow the impaction handle to dock with it through the portal

The same alignment guide is used to allow the 40/25 orientation already described for the portal placement. However, the natural anatomy is still easily visible as a guide for socket position including the TAL
The definitive liner is now introduced through the main incision with the impactor. This is again ‘docked’ with the impaction handle through the portal.

A trial is undertaken with the real socket and liner against the femoral rasp/neck/head combination.
There are two different techniques to reduce and trial .
My preferred method is to first place the femoral head into the socket (In–situ) .The femoral neck is placed into the rasp using the neck holding forceps. Movement of the leg allows the femoral neck to sit over the entrance to the head. Traction and elevation of the knee dock the trial head and neck together (Direct reduction).
Take care to align the head and neck as well as possible before beginning to lift the knee to avoid ‘chasing the head’ around as it moves within the acetabulum.
Due to the complete preservation of the soft tissue envelope and the resulting stability, I prefer this method over the traditional manner of reduction.
The second method (Ex-Situ) is more traditional. The trial neck is inserted in the same manner as described above, with the femoral head then being firmly impacted onto the dry/clean taper of the trial neck . Using the curved head impactor and bone hook, the head/stem construct is then maneuvered into the acetabulum.

After a full trial of soft tissue tension, leg length, range of movement and stability has been undertaken, the construct is disengaged.
To facilitate easier removal of the trials, the neck is ‘levered’ from the rasp by using the spiked T handle on the neck, levering against the black hook in the rasp.
Another sign of enhanced posterior stability is the ability of the femoral head and short rotators to pinch a finger placed between them whilst flexing and internally rotating.

The definitive femoral stem is placed and impacted into the femur after the femoral head as been placed into the socket. This is especially important if using the fixed neck ‘Classic’ stem rather than the modular neck stem as the neck will get in the way of head placement.
The implants are then docked as with the trials ensuring a clean dry taper inside the femoral head and the trunion of the stem.

After thorough washout of the joint cavity and local anaesthetic infiltration as required, the closure begins with the capsule. A single running suture from the rim of the socket to the GT easily opposes the straight line capsular incision. I personally use a heavy Orthocord or Fibrewire suture on a short curved needle for ease of access.
If Piriformis has been released with the capsule it will often already be repaired but if not, it can be reattached to the posterior border of the glutei or the GT.
Fascia and skin are the closed in a standard manner.

The stab incision for the portal is closed before standard dressings are placed.

A routine post-operative x-ray is taken to show implant position and fixation as well as allowing measurement of accurate leg-length and offset reproduction.

Post operative rehabilitation is similar to traditional hip replacement techniques with some modification:
Minimal or no post operative restrictions are required regarding range of movement. Patients are told to do whatever feels comfortable but obviously extremes of range of movement should be ‘tested’ gently.
Recovery has been proven to be faster with regards time to coming off crutches, time to returning to driving and returning to work. (reference 3)
If anything, patients often have to be held back from too much activity as this will often cause some short term muscular and soft tissue problems such as Psoas tightness.

The results of this technique can be seen in several papers (shown below). These confirm the initial safety of the technique during the learning curve and the short term recovery benefits. Long term data is still required to confirm the longevity of implant survival and show any subtle improvements in long term function.
Reference 1 – Perioperative outcomes for nearly 500 consecutive Supercapsular percutaneously-assisted total hip replacements. Chow J, Fitch D e-poster, 28th ISTA, Vienna, October 2015
Reference 2 – Gofton W, Chow J, Olsen KD, Fitch DA. Thirty-day readmission rate and discharge status following hip arthroplasty using the supercapsular percutaneously-assisted total hip surgical technique. Int Orthop 2015;39:847-51.
This paper compares the results of almost 500 SuperPATH cases performed by 3 separate surgeons against the nationally published data for Canada and North America. The length of stay was reduced from 3.3 days (American) and 5.0 days (Canada) to 1.6 days. The 30 day readmission rate was reduced from 4.2% to 2.3%. Although this has economic implications in the American system (due to bundled payments) it is also a sign of surgical safety and low early complication rates. The discharge status was significantly improved with 95.3% of patients being discharged home rather than to nursing facilities (usual in over 30% of American patients). Complication rates were shown to be low confirming the safety of the technique.
Reference 3 – Qurashi S, Chinnappa J, Rositano P Asha S. SuperPATH Minimally invasive total hip arthroplasty – An Australian experience. JISRF, Reconstructive review. 2016;6:2
This retrospective review of the first 100 cases at 1 year follow up concentrated on return of early function. Within 2 weeks 86% of patients were walking without aids and 84% were able to dress independently. 81% of patients were driving within 4 weeks and 52% of those who worked pre-op returned to work within 2 weeks
Reference 4 – Percutaneously assisted total hip (PATH) and Supercapsular percutaneously assisted total hip (SuperPath®) arthroplasty: learning curves and early outcomes. Rasuli KJ, Gofton W; Ann Transl Med. 2015 Aug;3(13):179
Reference 5 – Della Torre PK, Fitch DA, Chow JC. Supercapsular percutaneously-assisted total hip arthroplasty: radiographic outcomes and surgical technique. Annals of Translational Medicine. 2015;3(13):180.
This publication describes the surgical technique in detail and the early results from the design surgeon. The post operative radiographs from the surgeons learning curve were examined and show good accuracy of implant positioning. This is important as previous ‘minimally invasive techniques’ have been criticised for poor long term results due to poor implant positioning.
Reference 6 – Gofton W, Fitch D. In-hospital cost comparison between the standard lateral and supracapsular percutaneously-assisted total hip surgical techniques for total hip replacement. Int Orthop. 2015;40:481-85.
This paper compares the cost of care between a group of 49 SuperPATH patients and a group of 50 Lateral approach patients from the same institution. The mean length of stay was 2.1 days in the SuperPATH group compared to to 5.1 days in the lateral group.
This paper compares the results of almost 500 SuperPATH cases performed by 3 separate surgeons against the nationally published data for Canada and North America. The length of stay was reduced from 3.3 days (American) and 5.0 days (Canada) to 1.6 days. The 30 day readmission rate was reduced from 4.2% to 2.3%. Although this has economic implications in the American system (due to bundled payments) it is also a sign of surgical safety and low early complication rates. The discharge status was significantly improved with 95.3% of patients being discharged home rather than to nursing facilities (usual in over 30% of American patients). Complication rates were shown to be low confirming the safety of the technique.
Reference 3 – Qurashi S, Chinnappa J, Rositano P Asha S. SuperPATH Minimally invasive total hip arthroplasty – An Australian experience. JISRF, Reconstructive review. 2016;6:2
This retrospective review of the first 100 cases at 1 year follow up concentrated on return of early function. Within 2 weeks 86% of patients were walking without aids and 84% were able to dress independently. 81% of patients were driving within 4 weeks and 52% of those who worked pre-op returned to work within 2 weeks
Reference 4 – Percutaneously assisted total hip (PATH) and Supercapsular percutaneously assisted total hip (SuperPath®) arthroplasty: learning curves and early outcomes. Rasuli KJ, Gofton W; Ann Transl Med. 2015 Aug;3(13):179


Reference

  • orthoracle.com
Dark mode powered by Night Eye