///

Total Hip Replacement- Birmingham Hip resurfacing (Smith and Nephew)

Learn the Total Hip Replacement: Birmingham Hip resurfacing (Smith and Nephew) surgical technique with step by step instructions on OrthOracle. Our e-learning platform contains high resolution images and a certified CME of the Total Hip Replacement: Birmingham Hip resurfacing (Smith and Nephew) surgical procedure.
Hip Resurfacing had been the poor relation of Total Hip Replacement for the past 50 years. Theoretically resurfacing, that spares much of the normal bone stock and replaces worn-out anatomy “like for like” on a size basis, is an intuitive solution. As a design solution resurfacing was also widely accepted in replacement knee and shoulder arthroplasty.
Historically though the use of conventional materials for Hip resurfacing implants had failed to match expectations, even regarding the medium term outcomes. Historic metal/polyethylene bearings, such as the Wagner, Amstutz or Buechel-Pappas, had resulted in greater than 50% failure rates at 5 years.
Metal on metal resurfacing was revived by Derek McMinn in the early ’90’s, using the experience gained from the success and failures in early Hip resurfacing to focus on component size and appropriate alloys and joint manufacturing techniques, particularly in relation to the bearing surfaces. The resulting Birmingham Hip Resurfacing (Smith and Nephew) has shown outstanding longer term results.
What other similar but non-identical implants that have followed from other sources have helped demonstrate is that success with this type of implant is very much design, implant and orientation dependent. What has also become evident is that universally excellent results can be achieved in younger male patients, but there is generally less margin for error in component position in females and those with poor(weak) bone stock
This section is my perspective, as a Surgeon involved in the design, on the optimum operative technique for implantation of a Birmingham Hip resurfacing, and is as I use in my own practice.


Indications are similar to THR; pain, loss of function and an analgesic requirement. HR patients tend to be younger (my series- mean 51y, NJR- 54y) and have a greater expectation of functional outcome with a particular emphasis on return to sport.
Different index pathologies carry differing outcomes (Mc Bryde et al.). Regular OA in males with head diameters greater than 50mm is associated with near perfect survival well into the second decade. In contrast small female hips with dysplasia and high combined anteversions fail earlier, mainly due to edge wear issues.
Different devices have widely differing outcomes- principally as a result of metallurgy, cup geometry and cup fixation. In the mid 2000’s there were up to 20 metal resurfacing devices on the open market. Presently, there are 3 or 4 remaining devices; the BHR is the most widely used.

Not the most straightforward hip to start with for a resurfacing.
There is shortening of the limb and segmental collapse of the femoral head and a very disordered acetabulum in this case of previous CDH.
On the positive side the patient is a fit and very active adult male who has good bone stock. He also needs to return to a heavy manual occupation in which he has to function for several more decades.

Standard Hip Resurfacing is performed through a posterior approach with the patient in the lateral position with hips flexed at 30 – 40 degrees. A pillow is placed between the legs to prevent adduction of the operated leg.

The posterior support is positioned above the natal cleft. The lower border is in line with the posterior superior iliac spine.

The anterior support is positioned between pubic symphysis and anterior superior iliac spine. Postioning too low can restrict femoral exposure.

The hip is draped with universally standard hip drapes held in place by an Opsite film.

The incision is centered on the posterior border of the Greater Trochanter extending proximally and distally. The proximal limb determines femoral head exposure and the distal limb facilitates acetabular access.
Incisions for resurfacing are generally longer than for Total Hip Replacement to allow for access and correct component positioning

It is important to incise the fascia lata sufficiently distal so that it can slide over the lesser trochanter; if incomplete, it is difficult to elevate the femoral head into the wound.

A Charnley type retractor is placed in the centre of the wound; increased tension does not equate to increased exposure so the retractor is set a little ‘loose’.
A Judd nail is placed in the ilium between the piriformis and gluteus minimus tendons to delineate the proximal extent of capsular exposure.
The trochanteric bursa is swept back protecting the sciatic nerve inferiorly.

The assistant internally rotates the extended femur to tension the external rotators. A cutting diathermy cuts the external rotators from the nail marker proximally to include the gluteus maximus tendon distally.

Only a cutting diathermy discriminates between capsule and rotators; we believe that it is increasingly important to be able to perform a capsular repair on closure to optimise function.

The femur is gradually internally rotated to tension the capsule and the femoral head becomes exposed

Once the femoral head is exposed, three critical releases are performed;
the first is to make a linear cut in the fascia lata/ vastus down to periosteum just distal to lesser trochanter to prevent these tissues from restricting the femur in the wound.

The second manoeuvre is the inferior capsular release.
The assistant extends the leg and internally rotates whilst the operator passes the capsular scissors close to psoas tendon inferiorly cutting the capsule as far as the anteroinferior acetabular wall. This can be performed under direct visualisations

The third release is the most critical; harm can be done !
The assistant sweeps the leg across so that it is flexed at the hip to almost 90 degrees and fully internally rotated with the tibia point to the ceiling perpendicular to the floor.
The surgeon needs to stand directly in line with the femur and place the capsular scissors with tines either side of the antero-superior capsule aiming towards the medial epicondyle- away from the femoral vessels. The assistant will feel the tension change as the capsule is cut.
This manoeuvre must be undertaken with great care and allows for critical anterior retractor placement and displacement of the femoral head when preparing the acetabulum. The poor execution of this step is the commonest cause of failure to achieve an adequate exposure.

Head size is determined by the most appropriate lollipop spacer that demonstrates free excursion around the neck,
A definite decision on implant size should not be made until sequential reaming of the acetabulum has been performed

If the three releases described previously have been performed, there should be no issue in gaining a circumferential view of the acetabulum. If this is not the case, these manoeuvres need to be repeated.
Acetabular exposure is achieved with nails and retractors. Unlike THR, the femoral head and neck are intact and these obstruct access to the acetabulum.
For a left hip a narrow Hohmann retractor is place anterior to the acetabulum in the 10 o’clock position levering the head and neck anteriorly. For a right hip this is in the 2 o’clock position.

Next, Judd nails are placed in the ischium, angled slightly backwards and in the 12 o’clock position angled slightly cephalad

Finally, a broad Hohmann is placed inferiorly under the transverse acetabular ligament giving a circumferential view of the acetabulum. If only one assistant is present this can be held by securing it to the Charnley retractor with a clamped swab.

Acetabular reaming is initiated with a hemispherical reamer.
The starting diameter is generally 7mm below proposed cup diameter, is performed with odd numbered reamers sequentially increasing in 2mm increments, ultimately reaming 1mm below proposed implant size.

Reamers are generally open style so the amount of bone removed can be assessed. The angle of reaming tends to be dicated by the native acetabulum unless significant deformity exists.
Female patients’ osteoarthritis is generally the result of dyspasia. An assessment needs to be made of femoral neck anteversion at the time of dislocation or on preoperative CT scanning; a combined anteversion of greater than 45 degrees is to be avoided.
In the presence of significant femoral neck anteversion, the acetabular reaming and cup version should be more neutral to avoid edge wear.
Conversely in the presence of femoral neck retroversion one may consider anteverting the cup more than 20 degrees.

The acetabulum is usually reamed to 1mm under cup size. Trials can be used to assess pressfit fixation.
The backside of the BHR cup is much rougher than a regular cementless cup and tends to drag in any redundant soft tissue in to the prepared socket; it is essential that every effort is made to remove residual labrum. Failure to do so will result in failure to seat the cup and loss of fixation.

The BHR cup has inferior splines that are designed engage with the pubis and ischium. The cup must be appropriately orientated ensuring these spline are inferior.

Cup position is critical for longevity of the implant. Mean cup inclination and version should be 40 degrees and 20 degrees respectively- although this has to be tailored to the individual especially taking femoral version into account as described before.
If an inclination of 40 degrees cannot be achieved with the straight cup introducer then the incision may need to be extended inferiorly or an angled cup introducer used.
There is significant peripheral friction on cup impaction and a heavy hammer is required.

Once the cup is in position, its stability is assessed. If satisfactory the wires are cut and the plastic impactor cap removed. It is essential to check that all wire and its plastic coatings have been removed.
Peripheral osteophytes are removed and a small swab placed in the cup; the femur is then addressed….

The femur is adressed by extending the lower or unoperated leg; ie the surgeon pulls the lower leg towards him.
This results in the unoperated leg acting as a fulchrum when the operated leg is flexed over it; this elevates the femoral head out of the wound.
A vent hole is drilled in the lesser trochanter for later insrtion of a vent cannula.
The head is reduced into the cup and a small pin is drilled into the lateral femur opposite the lower border of the lesser trochanter. This is angled distally to allow easy application of the guide wire jig.

The hip is then dislocated and maximally internally rotated. The long arm of the femoral jig is attached to the femoral pin. The assistant places the head in the proximal ‘V’ of the incision and pushes the flexed knee towards the operator.
The two tines of the jig are loosely squeezed and the cannulated bar self centres.
The surgeon should be aware of the relatioship of the head to the neck and have an appreciation of version.
The guidewire entry point is usually 10-12mm cephalad to the fovea and looks eccentric.

The guidewire is advanced about 8-10 cm but avoiding distal cortical contact.
The ideal position is 5 degrees of valgus and central in the lateral plane.

The position is checked with a stylus of appropriate size.
Notching is to be avoided at all costs- this is the single greatest cause of neck fracture.
The suction cannula is inserted into the predrilled lesser trochanter

The guidewire is overdrilled with cannulated drill
Secondary suction is attached to the lesser trochanteric cannula

The central bar is placed in the drilled hole and the stylus is again rotated around the neck to demonstrate safety from notching and around the head to indicate extent of bone resection.

The cylinder reamer is advanced on the central bar whilst the neck is protected by the lollipop neck sizer; notching of the neck must be avoided !

The redundant bony annulus is carefully reamed woth a blade to avoid unnecessary retinacular damage

A ‘napkin ring’ guide is place over the femoral head. The lower border is approximated to the head/neck junctio and the capital cut is made with an oscillating saw.

The central bar is replaced and a chamfer reamer applied to the proximal cut surface of the head.

Residual cysts are drilled and curetted.

The proximal drill hole is expanded with a short expansion drill.

The head is thorough lavaged and dried and suction is introduced into the drill hole whilst low viscosity cement is mixed.

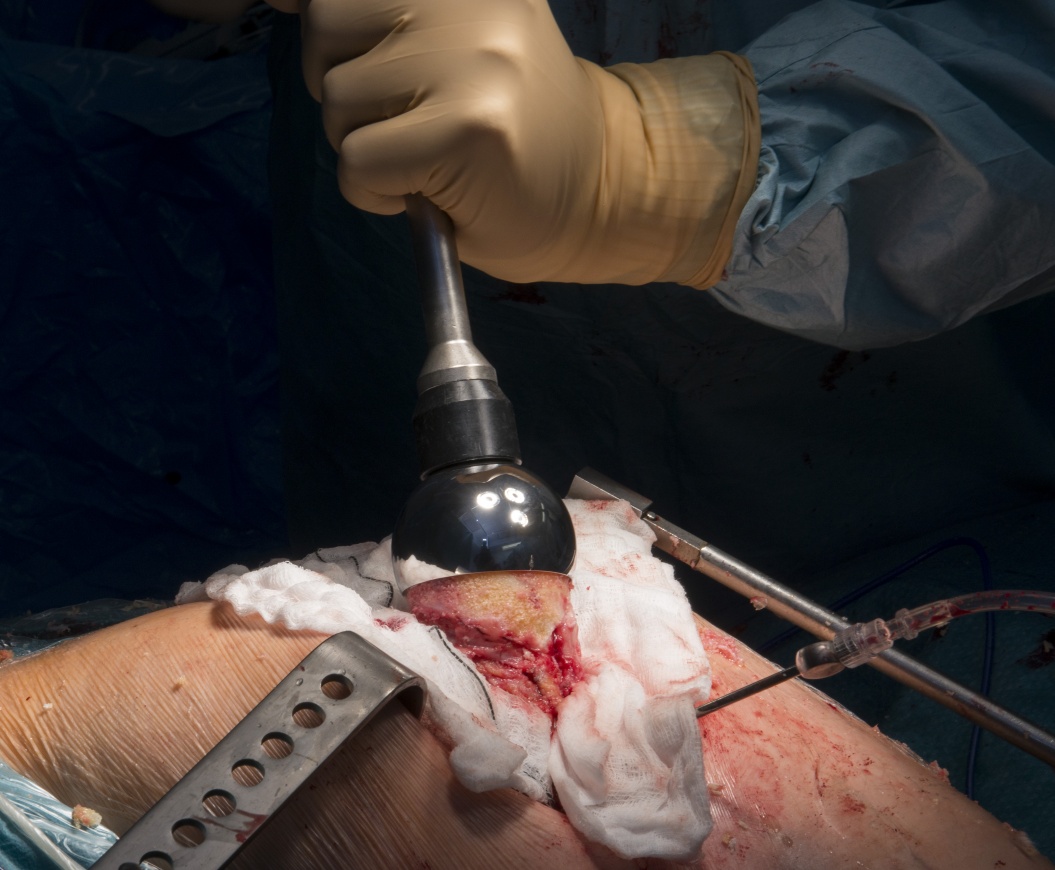
The head is then impacted into position
The cup is thoroughly inspected and cleaned and the head reduced and range of motion and stability checked.

Soft tissue closure is similar to any routine posterior approach
The capsule and rotators are closed with a running locked looped PDS suture; this incorporates the gluteus maximus tendon and is usually run in two rows, locking all the way.

The fascia lata is closed with a double stranded nylon starting distal and locking at the musculotendinous junction.
Depending on adipose, fat closure is with vicryl followed by subcuticular PDS and Skin Staples

An absorbent dressing is applied and the patient transferred to Recovery.

Not the most straightforward hip to start with for a resurfacing.
There is shortening of the limb and segmental collapse of the femoral head and a very disordered acetabulum in this case of previous CDH.
On the positive side the patient is a fit and very active adult male who has good bone stock. He also needs to return to a heavy manual occupation in which he has to function for several more decades.

The early post-operative image reveals symmetry well restored.

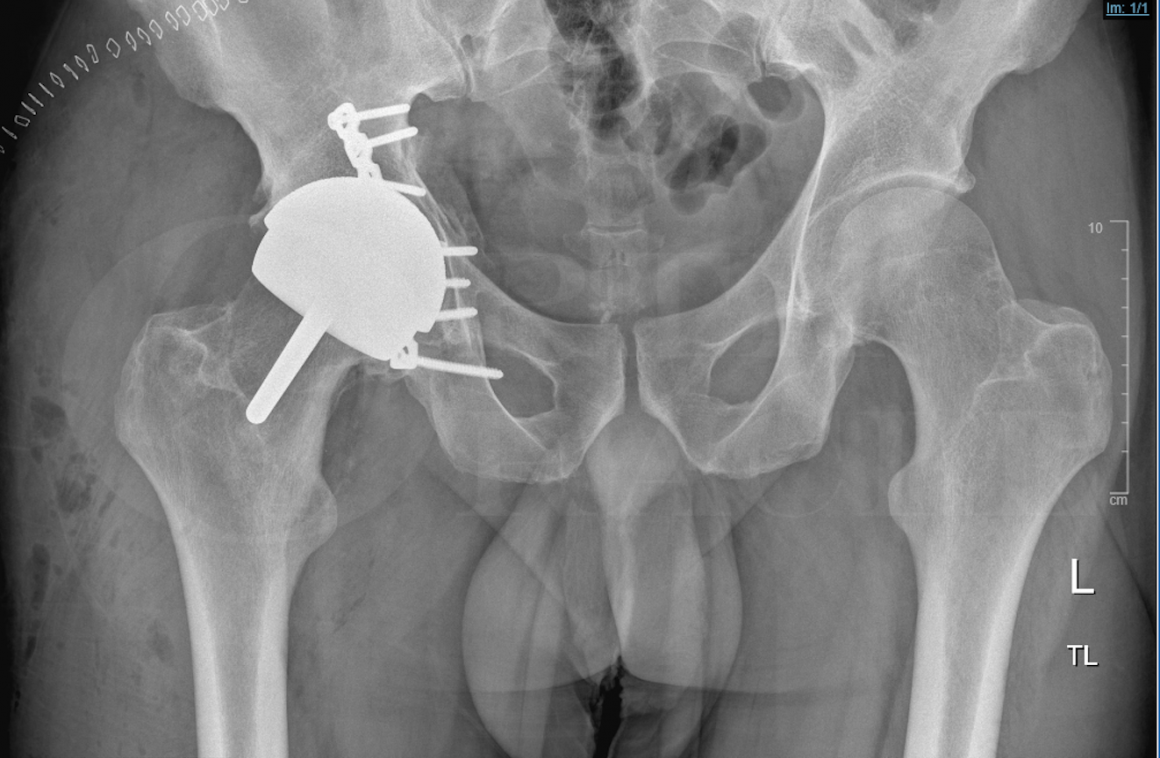
A post traumatic arthritis in.a patient who has required some acetabular reconstruction.
This sort of case needs CT assessment to decide whether there will be adequate bone stock available for acetabular preparation without intercurrent removal of these pre-existing implants.

It has been possible here to retain the internal fixation without compromising the acetabular preparation or component fixation and position.

Although hip resurfacing is a bone sparing procedure, in order to create access, soft tissue releases are more extensive than for contemporary THR approaches and this tends to result in more lower limb swelling in the second week.
Whilst dislocation precautions are not necessary, patient and physiotherapists need to undersatnd that soft tissue healing must occur before encouraging active rehabilitation. In practical terms, I keep patients on crutches for two weeks then two canes for two weeks and then mobilise according to pelvic stability or discomfort. I urge patients to walk but discourage exercises during the first six weeks to increase range of movement.
During the second six weeks, I am happy for the patients to return to rhythmic gym activities avoiding jumping, road running and squatting for 4-6 months.
Hip flexion is the final movement to return and carries on improving for over 12 months.
Patients occasionally complain of squeaking at 8-12 weeks usually for several hours duration never to return.
A percentage of patients persist with groin pain at 3 months and this may require some attention to the psoas tendon with physiotherapy or local injection.

The outcome of the Birmingham Hip Resurfacing in patients aged < 50 years up to 14 years post-operatively.
Matharu GS1, McBryde CW, Pynsent WB, Pynsent PB, Treacy RB.
Bone Joint J. 2013 Sep;95-B(9):1172-7.
Birmingham hip resurfacing arthroplasty. A minimum follow-up of five years.
Treacy RB, McBryde CW, Pynsent PB.
J Bone Joint Surg Br. 2005 Feb;87(2):167-70.
Birmingham hip resurfacing: a minimum follow-up of ten years.
Treacy RB1, McBryde CW, Shears E, Pynsent PB.
J Bone Joint Surg Br. 2011 Jan;93(1):27-33.
Results of Birmingham hip resurfacing at 12 to 15 years: a single-surgeon series.
Daniel J1, Pradhan C2, Ziaee H1, Pynsent PB2, McMinn DJ1.
Bone Joint J. 2014 Oct;96-B(10):1298-306.
Long-term results of Birmingham hip resurfacing arthroplasty in Asian patients.
Uemura K1, Takao M1, Hamada H2, Sakai T2, Ohzono K3, Sugano N4.
J Artif Organs. 2017 Aug 30.
Birmingham hip resurfacing at a mean of ten years: results from an independent centre.
Coulter G1, Young DA, Dalziel RE, Shimmin AJ.
J Bone Joint Surg Br. 2012 Mar;94(3):315-21.
The ten-year survival of the Birmingham hip resurfacing: an independent series.
Murray DW1, Grammatopoulos G, Pandit H, Gundle R, Gill HS, McLardy-Smith P
J Bone Joint Surg Br. 2012 Sep;94(9):1180-6
.
Part of the controversy surrounding hip resurfacing has been the variability of results. Having been involved with the renaissance of hip resurfacing for the past twenty five years, I have witnessed first hand the tribal circus of implant marketing and propaganda. There was a reluctance for many years to accept that there were significant differences in resurfacing implant design and materials which had consequences for implant survivorship and performance.
With the benefit of hindsight, joint registries and and large series, definite conclusions can now be made as follows:
1.Results are device dependent.
2.Results are gender dependent
3.Results are size dependent
4.Results are aetiology dependent
5.Results are surgeon/centre dependent
Joint registries often fail to stratify according to the above and overall results are skewed by inclusion of inappropriate cohorts.
Male patients under age of 50 with a diagnosis of osteoarthritis with BHR performed by a high volume surgeon can expect a 20 year survival of 97% (Van der Straeten – personal communication; to be published 2018); this is unprecedented in joint replacement
In contrast, in one centre a 30% failure at 10yrs is reported in females with BHR.


Reference

  • orthoracle.com
Dark mode powered by Night Eye