//

Ankle fracture- Postero-lateral plating of pronation-external rotation ankle fracture (posterior malleolus))

Learn the Ankle fracture: Postero-lateral plating of pronation-external rotation ankle fracture (posterior malleolus)) surgical technique with step by step instructions on OrthOracle. Our e-learning platform contains high resolution images and a certified CME of the Ankle fracture: Postero-lateral plating of pronation-external rotation ankle fracture (posterior malleolus)) surgical procedure.
Most ankle fractures are stable meaning that, under physiological loading, the bony and ligamentous stabilisers of the ankle joint are sufficiently intact allowing normal positioning and motion of the talus in the mortise. Stable ankle fractures do not require surgical treatment.
Some unstable fractures can be reduced and held in a suitable cast such that the reduction is maintained whilst fracture union takes place. However, achieving and maintaining reduction in some ankle fractures is not possible and it is these unstable fractures that require internal fixation. Medial injuries such as deltoid ligament or medial malleolar fractures often impact upon fracture stability. Posteriorly, fractures of the posterior tibial plafond or posterior malleolus are often associated with unstable fracture patterns. Laterally, a proximal fibula fracture or evidence of disruption of the distal tibio-fibular syndesmosis are often features seen in unstable ankle fractures.
Orthopaedic trauma dogma has previously taught that the indication to fix a posterior malleolar ankle fracture is determined by the size of the fragment (oft quoted as 25-33% of the AP dimension). The real indication for fixation of these fracture fragments is to restore stability to an unstable fracture pattern. Quite often it is clear that the presence of a large fragment is an indication but the other reason for restoring stability by fixing these fragments is to reverse the pattern of injury especially in a dislocation.
In my hands, the posterolateral approach is the workhorse to fix these fractures but significant propagation of the fracture lines into the medial malleolus may necessitate a separate posteromedial approach. Both of these approaches allow anatomic reduction of the joint surface and the application of appropriate fixation. It is for this reason that I never use screws placed from anterior to posterior.
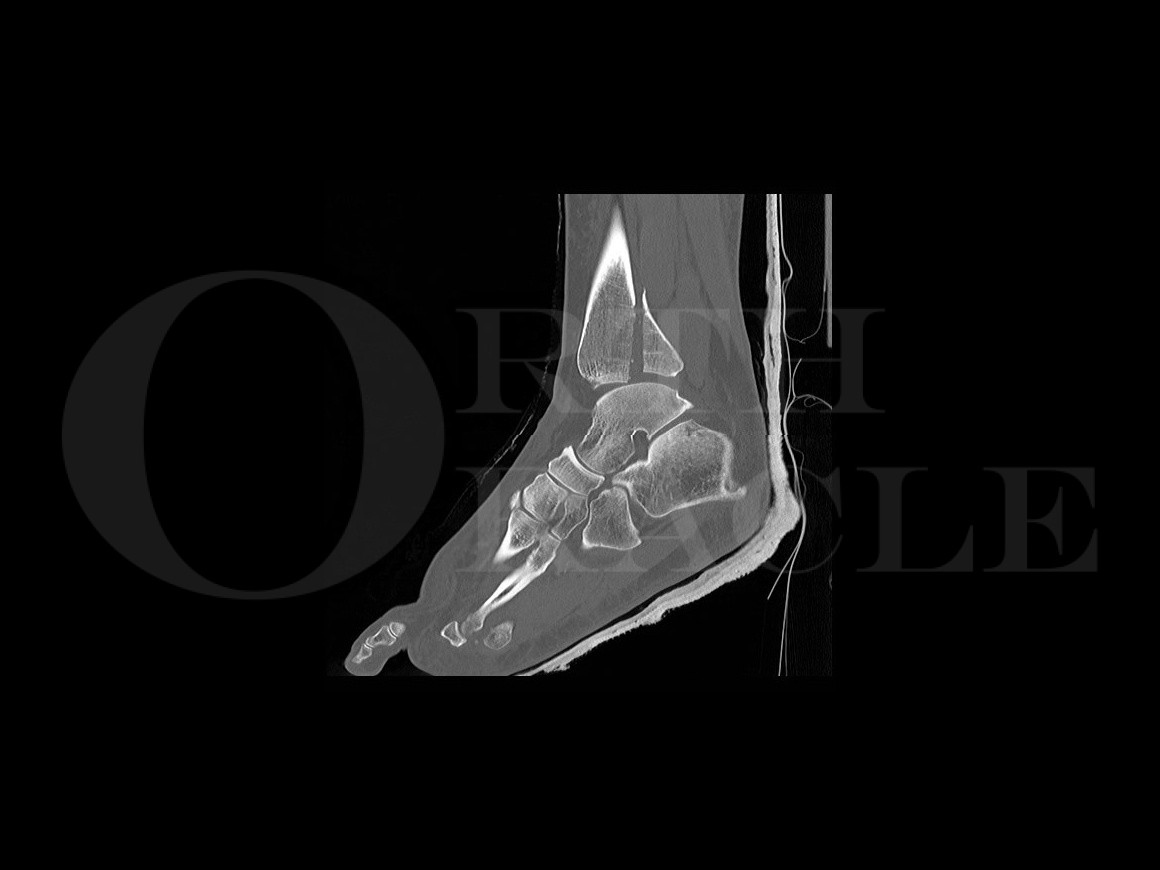
In this case, a 48-year old female sustained a closed injury to her right ankle after slipping. She sustained a closed, pronation external rotation ankle fracture pattern and her soft tissues were in good health when taken to the operating theatre within 24 hours of injury.


INDICATIONS
An acute, unstable, fracture of the ankle that is either irreducible or where maintaining a stable reduction by closed methods is likely to be unsuccessful.
SYMPTOMS & EXAMINATION
The patient will present with pain and swelling. In an unstable ankle fracture, the patient is unable to bear weight. In a clear ankle fracture-dislocation, the patient will have an obvious deformity of the ankle. The soft tissue envelope may be compromised either with an open wound (usually located medially) or skin blanching and blistering. Manipulation and reduction of a clear fracture-dislocation and application of back slab cast is mandated to provide temporary immobilisation.

In the presence of an open wound, urgent wound toilet, administration of appropriate antibiotics, and sterile dressings should be applied. The tetanus toxoid status of the patient should be noted and appropriately acted upon. Any blisters should also be dressed with non-adhesive dressings. Manipulation and reduction of the fracture should then be performed and a temporary cast applied whilst plans are made for urgent debridement and temporary external fixation in an operating theatre. Realistically, these fractures can be fixed up to 3 weeks from date of injury but instead of evacuating a fresh haematoma like operating within the first few days, the soft callus needs removing from in between the fracture fragments and mobilisation of the fracture is more tricky. In addition, the satisfying clunk of reducing the posterior malleolus is less evident.
IMAGING
Plain radiographic assessment should be the initial mode of imaging. Two standard orthogonal views should be taken. My personal view, and that of my colleagues in Sheffield, is that a CT scan is mandated in the following three ankle fracture scenarios:
Any history of dislocation
Suspected syndesmotic injury
Evidence of posterior plafond involvement
A CT is particularly helpful in demonstrating the pathoanatomy of the posterior malleolus according to the Haraguchi classification. This aids in planning surgical approach and methods of fixation. CT will also identify any intercalated “dye punch” fragments that may impede reduction necessitating reduction or excision. MRI may be of limited benefit but can help in assessing concurrent ligamentous injuries. The identification of a posterior malleolar fracture fragment and its associated pathoanatomy means that a postero-lateral approach to fix this fragment may be warranted. An associated fibula fracture can be accessed through the same surgical wound with ease.
ALTERNATIVE OPERATIVE TREATMENT
There are many methods of applying internal fixation to the many variations in fracture patterns. In a pronation-external rotation ankle fracture pattern, a posterior malleolar fracture fragment is a common feature. The Association for Internal Fixation (ASIF)/Arbeitsgemeinschaft fur Osteosynthesefragen (AO) group ) used to instruct indirect reduction methods for this fracture fragment with internal fixation provided by anterior to posterior part-threaded screws. This technique is possible for some fracture fragments but malreduction is difficult to mitigate against and can be difficult to interpret from fluoroscopic imaging. Certainly, the biomechanics of this fixation method are inferior to direct reduction and buttress plating.
External fixation or fine wire fixators may be used as definitive operative treatment methods but, in my opinion, this is rarely indicated other than in situations where the soft tissues are in poor health or in cases of polytrauma that never become fit enough for definitive fixation.
NON-OPERATIVE MANAGEMENT
By and large, unless the patient is insufficiently fit for surgical treatment, open reduction and internal fixation is warranted in unstable and poorly stabilised ankle fractures. If a patient is medically unfit for ORIF then cast treatment may be considered.
CONTRAINDICATIONS
Be very aware of the red, swollen and unstable foot with little pain. This presentation should raise the suspicion of a neuropathic foot undergoing a Charcot process. Whilst fixing an ankle fracture in the presence of neuropathy is not a contra-indication, it is important to distinguish between this clinical situation and a Charcot process. It may be most appropriate to treat suspected Charcot processes affecting the ankle with offloading and total contact casting.
It is never wise to make surgical incisions through blistered skin. In these instances, it is better to wait for the soft tissues to heal which may be aided by appropriate immobilisation in a cast or monolateral external fixator.

In my practice, planning a postero-lateral approach to the ankle means positioning the patient prone on the operating table. In so doing, be aware that fixing the medial malleolus is less easy because an assistant is required to bend and hold the knee at 90 degrees. The anaesthetist may also be less keen on positioning prone because of airway management and potential ventilatory compromise. Some surgeons advocate placing the patient in a “sloppy lateral” position which allows the surgeon to perform a postero-lateral approach and permits easier access to the medial malleolus. Alternatively, if placing the patient fully prone, in order to fix the medial malleolus, the patient can be turned supine after closing the posterior wound and applying a temporary, sterile dressing.

Fluoroscopy should be available with an image intensifier and a trained radiographer.

Appropriate antibiotics are administered and a thigh tourniquet and exclusion drape are applied. The limb is prepared with Chlorhexidine from toes to the tourniquet. It is important that the surgical drapes are also placed above the knee to allow the knee to flex to 90 degrees when fixing the posterior malleolus.

Position the patient prone on the operating table with suitable padding.
The operated leg is supported by pillows so that the toes do not touch the operating table. In this way, any posterior ankle subluxation with concurrent large posterior malleolar fracture fragment is likely to be reduced.
In order to gain optimal intra-operative fluoroscopic imaging, the ankle should not lie directly over any metal struts that form part of the structure of the operating table.

Mark the skin for key surface anatomical features: Achilles tendon, fibula and probable course of sural nerve.The lateral malleolus is located and its borders marked (A). The lateral border of the Achilles tendon is identified and marked (B). The course of the sural nerve, a sensory nerve, is variable “C” but usually obliquely crosses the lateral border of the Achilles tendon about 7cm from its calcaneal insertion. The position of the incision lies midway between the lateral border of the Achilles tendon and the lateral malleolus (D).

The incisiont lies midway between the lateral border of the Achilles tendon and the lateral malleolus. The skin and subcutaneous fat is opened with sharp and then blunt dissection taking care to look for the sural nerve. Inadvertent injury to the sural nerve can lead to painful neuroma formation.

Identify and preserve the sural nerve.The sural nerve (A) is often found accompanied by a significant vein running parallel to its course (B).

Identify the fascia overlying the muscle bellies of flexor hallucis longus and peroneus longus.The dissection is then deepened to identify the deep investing fascia surrounding the muscle bellies of flexor hallucis longs (FHL) and peroneus longus (PL).

Divide the deep investing fascia and mobilise the belly of flexor hallucis longus.At the level of the deep investing fascia, a constant anatomic feature are the deep perforating vessels so often utilised by plastic surgeons for local fascio-cutaneous flaps. In this image, one such vessel is identified at the end of the toothed forceps. This is either ligated or cauterised before proceeding to deeper dissection.
Further sharp dissection longitudinally along the fascial plane (A) between the belly of FHL and PL can then mobilise both bellies. A finger sweep deep to the belly of FHL will provide sufficient mobilisation to visualise the posterior malleolar fragment. Some soft tissue mobilisation occurs as part of the injury.
Mobilisation of the belly of PL will allow access to the posterior aspect of the fibula. In this case, with such a high fibula fracture, the decision was made not to disturb the fracture haematoma anticipating adequate reduction by restoring the posterior malleolar fracture fragment. However, if the fibula fracture did require internal fixation, the bellies of the peronei can be easily mobilised to reveal the posterior surface of the fibula.

Identify the posterior malleolus and gently place a retractor around the medial malleolus taking care to stay close to bone at all times.By mobilising the belly of FHL, the posterior malleolar fracture fragment is revealed (A). This is aided by placing a Hohmann retractor around the medial border of the distal tibia (B). Care should be taken when placing this retractor by “sticking close to bone” as the tibial neurovascular bundle courses close by. The posterior malleolar fragment has a characteristic shape with a significant proximally oriented apex. Not infrequently, the apical portion is also buckled and it is worthwhile looking for this on the CT. The periosteum is reflected off the distal tibia and haematoma removed from the fracture site. At this point, careful scrutiny of the CT will inform the surgeon of any significant fracture fragment debris lying between the two main fragments that can be removed/reduced by lifting and reflecting the posterior malleolar fragment.
Make sure that no sharp dissection occurs between the posterior malleolar fragment and the distal fibula because if the posterior inferior tibio-fibular ligament (PITFL) is divided, then the rationale of performing the fixation in this manner is obviated!

Reflect the periosteum over the posterior malleolus by incising it. This permits mobilisation of the fracture fragment.Reduction of the posterior malleolar fragment can then proceed. I usually stand at the end of the operating table for ease of manipulating the fracture fragments. Usually traction and ankle dorsiflexion provide some but minimal benefit, so the best way of achieving reduction is to use a ball and spike reduction tool. This is best applied closer to the ankle joint line rather than the fragile apical segment of the fragment. The fragment can then be pushed into a reduced position and the surgeon can feel the fragment seating into position.

Secure the posterior malleolus with a K-wire.This fragment is then secured by a temporary K-wire crossing from posterior to anterior through the metaphyseal flare. Note that when passing this wire, the surgeon should make a conscious effort to aim the wire much more cephalad than intuition would think. If not, then the wire can easily be driven into the ankle joint. The position of this wire is then checked in two planes on the image intensifier.
Care should be taken for assessment of anatomical reduction because the fragment can still rotate in the coronal plane in which case a second wire may be needed to control against this. The best way to assess for reduction is to run a finger around the apex of the fracture fragment feeling for steps between the fragments.

Place an uncontoured 1/3 tubular plate over the wire and onto the posterior aspect of the tibia.A 1/3 tubular plate of appropriate length is then selected to make sure that at least 2 screws can be applied proximal to the apex of the posterior malleolar fragment so that effective buttressing can take place (usually 4-6 holes in length). It is important that the plate is not contoured at all because by remaining uncontoured, the dynamic effect of buttressing using this plate is optimised. This latter point can be a criticism of anatomically pre-contoured plates.
The plate is best introduced into the wound by hooking the distal hole of the plate over the reduction wire and then feeding the proximal end of the plate underneath the belly of the FHL to lie on the posterior shaft of the tibia so that it points towards the centre of the popliteal fossa which is visible, as it should not be draped.
Note that the self-retaining retractors are present for the purposes of the photograph. I would caution against using these retractors against the delicate skin edges.
As an alternative to buttress plating, screw and washers may be used in fixing smaller fragments.

Sequentially reduce the plate onto the tibia from proximal to distal by application of bi-cortical screws.Small fragment cortical screws are then applied to the plate starting sequentially from proximal to distal so that each screw further pushes the plate against the posterior malleolar fragment.
I also apply partially-threaded screws across the metaphyseal segment of the fracture not only to achieve additional compression of the fracture but also to control against coronal plane rotation of the fragment. Care should be taken to ensure that all screws are of the appropriate length to engage the anterior tibial cortex. Long screws can irritate anterior soft tissue structures, especially tendons.

Secure the posterior malleolus with part-threaded cancellous screws.The AP intensifier film clearly shows the reduction of the apex of the posterior malleolar fracture. Note that by reducing this fracture, the fibula length has been restored. In addition, the syndesmosis has been reconstructed because the reduced posterior malleolar fracture re-tensions the PITFL relocating the distal fibula into the incisura.

The plate is shown with its proximal extent on the right of the image under the retracted belly of FHL. Note the contour of the plate with the application of the screws indicating the compression applied through the buttressing technique.

Confirm reduction fluoroscopically.This reduction is confirmed on the lateral intensifier view. In the presence of a more distal fibular fracture, I recommend fixing the posterior malleolus fracture first because appreciation of the posterior malleolar reduction is more difficult if obscured by metalwork applied to the fibula. The only exception to this rule is if the fibula is less comminuted than the posterior malleolus, in which case, it is always better to restore anatomy by fixing the simpler fracture pattern first.

Proceed to fixation of the medial malleolus by flexing the knee to 90 degrees.Having decided that, in this case, the fibula fracture did not need fixation, attention is then turned towards fixing the medial malleolar fracture. With an assistant, the knee is flexed to 90 degrees and the outline of the medial malleolus is marked on the skin.

A longitudinal medial skin incision is made. Periosteum is removed from the fracture site.A longitudinal approach allows good access to the medial malleolus. It is important to remove all periosteum from the fracture site as it commonly prevents reduction. The medial malleolus can then be reduced under direct vision and guide wires placed across the reduced fracture. Note that the potentially unfamiliar situation of fixing an ankle fracture in a prone position may make the orientation of these guide wires a little confusing!

Apply guide wires across the reduced medial malleolar fracture fragment.Nonetheless, the wires still need to go from anterior to posterior in the sagittal plane as demonstrated.

Confirm the position of the guide wires fluoroscopically.The positioning of these wires can then be checked fluoroscopically.

Over-drill the wires and, one at a time, apply part-threaded cancellous screws and washers to compress the medial malleolar fracture.The appropriate screw lengths are then determined. After over-drilling one wire, I recommend applying one screw and washer and then repeating the process for the second screw. With each screw application, there should be visible compression at the fracture site with extrusion of the haematoma.

Check the fracture reduction and position of hardware fluoroscopically.Final views are obtained on the image intensifier in the AP plane…

…and the lateral plane. This fixation has conferred sufficient stability to the ankle mortise such that the fibula fracture need not be fixed and the ankle can be mobilised at two weeks.

Closure in layers. Apply plaster of Paris for temporary immobilisation.Wound closure is with interrupted 2/0 vicryl to the deep fascia and interrupted mattress 3/0 monocryl sutures to the skin. In my experience, a drain is not required.
I dress the wounds with Jelonet and apply dressing gauze, a layer of orthopaedic wool, a back slab and stirrup slab of Plaster of Paris and a final crepe bandage. The foot should lie in a plantigrade position. In a prone position, the application of the dressings and plaster slabs is much easier than in a supine patient.

Plain AP radiograph showing the very proximal fibula fracture, the displaced medial malleolar fracture and the triangular appearance of the posterior malleolar fragment.

The lateral plain radiograph demonstrates the ankle fracture dislocation but affords no detail about the posterior fracture path-anatomy.

Therefore, given this is an ankle fracture dislocation with a significant posterior malleolar fracture fragment, in our institution, a CT is mandated. This shows the significant posterior malleolar fracture fragment as well as the point loading of the talar dome on the central part of the tibial plafond. This image clearly illustrates why this fracture configuration is associated with higher rates of post-traumatic osteoarthrosis.

The axial CT slices show the obvious intact relationship between the distal fibula and the posterior malleolus. Therefore, the syndesmotic ligaments injured are the anterior inferior tibio-fibular ligament and the inter-osseous ligament as the fibula has rotated away from the incisura.
It is this axial CT view that allows the surgeon to classify the fracture according to the Haraguchi classification system. In this instance, it is a Haraguchi type 2 with the posterior malleolar fracture line propagating very postero-medially. It is on this scan, that a poster-lateral approach can be planned to restore anatomy.

In all cases, the patient is placed in a below the knee back slab for the first two weeks after surgery. At two weeks, the wounds are inspected and re-dressed. In unreliable patients a complete, lightweight below-the-knee cast is applied for a further four weeks and weight bearing is not permitted for the first six weeks after surgery. Anecdotally, I find the postero-lateral wound heals well as it rarely traverses skin that has been previously blistered. It is important not to impair wound healing by consciously avoiding the use of self-retaining retractors during the surgical procedure.
In trustworthy patients, at two weeks I prefer to apply a removable lightweight cast. This can be removed by the patient and ankle range of motion exercises can be commenced together with touch weight bearing as advised by the physiotherapist. This latter regime, permitting ankle range of motion, allows nourishment of the articular surface and may well reduce the risk of thrombi-embolic events.
In my practice, rivaroxaban is prescribed for the duration of cast application to prevent thrombo-embolic events.
At six weeks, in all patients weight bearing starts in normal shoes and invariably patients will require physiotherapy input to improve ankle range of motion.
In terms of post-operative imaging, I routinely take plain film imaging of simpler fracture patterns at 6 weeks. There is certainly merit in performing post-operative CT to check reduction in more complex fracture patterns especially if the posterior fixation forms part of internal fixation for a pilon fracture.

Buttress plate stabilisation of posterior malleolar ankle fractures: a familiar technique through an unfamiliar approach. MR Carmont, MB Davies. Current Orthopaedics 2008; 22(5): 359-364.
This educational paper compares the postero-lateral approach to the ankle with the anterior Henry approach to the distal radius and is designed to give surgeons confidence in employing the familiar wrist approach in an analogous manner to the ankle.
Pathoanatomy of posterior malleolar fractures of the ankle. Haraguchi N, Haruyama H, Toga H, Kato F. J Bone Joint Surg Am 2006; 88(5):1085-92.
This is the first CT classification of posterior malleolar fractures. It is an excellent paper because it highlights the need for surgeons to understand the pathoanatomy and apply that understanding to their surgical approach. It should be noted that it is the type 2 injuries that have been shown to be most frequently under-estimated in the clinical setting leading to poor management and outcomes.
Posterior malleolus fractures: worth fixing. Solan MC, Sakellariou A. Bone Joint J 2017; 99-B(11):1413-1419.
This excellent and current paper is written by two renowned experts in the management of ankle fractures. It is a clear and concise review of the literature regarding the posterior malleolus fracture and provides cogent and rational arguments about how to manage them.


Reference

  • orthoracle.com
Dark mode powered by Night Eye