///

Ankle Fusion (arthrodesis)- Trans-fibular approach using AnkleFix 40 plate (Zimmer-Biomet)

Learn the Ankle Fusion (arthrodesis): Trans-fibular approach using AnkleFix 40 plate (Zimmer-Biomet) surgical technique with step by step instructions on OrthOracle. Our e-learning platform contains high resolution images and a certified CME of the Ankle Fusion (arthrodesis): Trans-fibular approach using AnkleFix 40 plate (Zimmer-Biomet) surgical procedure.
Ankle arthrodesis is an established treatment for painful, end-stage ankle arthritis. Over the last century, a number of operative techniques have been popularised, with modifications reflecting technological advances. These have ranged in methods of fixation from the Charnley external clamps through to all manner of crossed/parallel screw fixation techniques.
However, managing deformity, poor bone quality or bone loss remain difficult issues to resolve using traditional techniques. As a result, biomechanical studies into the properties of angle-stable devices such as blade plates and non-anatomic locking plates have found some mechanical advantages over screws in stabilising an ankle arthrodesis, thus potentially offering a solution. Therefore, in Sheffield, Mr Mark Davies and Mr Chris Blundell developed a new anatomically contoured, fixed angled lateral locking ankle arthrodesis plate – the Ankle Fix 4.0. Manufactured by ZimmerBiomet, we have successfully used this device for open ankle fusion surgery especially in more challenging clinical situations. The rationale behind the plate design was formed after both authors had gained experience using an inverted PHILOS plate. It was felt that a set of divergent screws within a low-profile talar section would offer a significant pull-out strength in cancellous bone and similarly that convergent screws in the tubular, cortical bone would provide robust tibial fixation. These screws were specifically designed to be 4.0 mm in size to allow clustering of the screws which contrasts with the larger, less versatile plate designs that were on the market at the time of design in 2009.
With limited literature on the wealth of new locking ankle fusion plates, the plate designers present these results and discuss their large series in the December 2017 issue of the journal Techniques in Foot and Ankle Surgery.

Indications
The indications for use of the Ankle Fix 4.0 lateral locking plate include:
1 End-stage arthrosis of the ankle joint, especially in the presence of deformity or osteopenia
2 Failed previous ankle arthrodesis (mal-union and non-union)
3 Tibio-crural bone loss (failed total ankle replacement, avascular necrosis) provided there is sufficient remaining bone stock in the body of the talus.
The Ankle Fix plate is a tool to combat the above challenges therefore, in my practice, it is used if an arthroscopic ankle fusion cannot deal with any of the above indications.
Symptoms & Examination
In all of the indications, pain is the most common symptom. However, when present, deformity may be equally as disabling especially if the patient is struggling to find stable, comfortable, corrective or accommodative footwear. Therefore, another intrusive symptom may be the instability with any associated pain or swelling.
Examination for all indications should include a careful appraisal of the soft tissue envelope. Specifically, the location of previous surgical scars will govern future surgical approaches, the presence or absence of pedal pulses will influence the ability of a fusion mass to heal and, any evidence of ongoing or previous infection may abort plans for further surgical intervention.
Assessment of any deformity requires consideration of all three planes of deformity. The deformity should be assessed for fixity and also the mobility of neighbouring joints, especially the subtalar and talo-navicular joint. Wherever possible, the subtalar joint should be preserved not only because fusing this joint adds significant morbidity, but also because a tibio-talo-calcaneal fusion is associated with poorer functional outcomes.

Investigation
In my practice, weight-bearing views in two planes of the ankle and an additional oblique view of the foot are mandatory as baseline imaging. In the case of a large coronal pane deformity it is particularly pertinent to fully assess the subtalar joint. When the subtalar joint is suspected of being symptomatic, a fluoroscopically guided arthrogram and local anaesthetic injection is helpful in isolating the source of symptoms. The reason for the arthrogram in this assessment is to determine any continuity of joint capsule between neighbouring joints as this can confound the results of the local anaesthetic infiltration.
CT is another useful investigation as this can assess neighbouring joint disease as well as determine remaining bone stock after previous surgeries. As a rule there should be approximately 2cm of remaining height of the body of the talus to accommodate the talar footprint of the Ankle Fix 4.0 plate.
Operative alternatives
In broad terms, ankle arthrodesis can be performed either by open or arthroscopic methods. Initial use of arthroscopic ankle fusion was confined to cases with minimal coronal plane deformity, but over time experienced enthusiasts of this technique have been more able to deal with larger deformities. Clearly, it has no role in revision surgery and it may be less effective in poor quality bone.
Open techniques using various numbers and positioning of screws have been the mainstay of ankle fusion procedures for decades. Some experienced enthusiasts have had success in dealing with large deformity and with bone loss and poor bone quality, but with an ageing population, these latter two issues have become more apposite. More people are presenting later in life with end-stage ankle arthrosis and after failed total ankle replacement necessitating alternative methods of fixation. Although Ilizarov techniques can be used to address these problems, these fine wire frames are not well-tolerated by patients.
Contraindications
Absolute contraindications for this technique include active Charcot arthropathy and the presence of either superficial or deep infection.
Non-operative intervention
Non-operative pharmaceutical measures may include judicious use of analgesics and anti-inflammatory medications (NSAIDs) and selective use of intra-articular injections of corticosteroids. Recent literature has questioned the safety of long term use of NSAIDs and any opiate based medication risks the patient becoming tolerant and dependent on the medication.
Quite often with mechanical pain, mechanical measures are more effective. Therefore, the input of an orthotist is extremely helpful in deciding whether to try corrective or accommodative insoles, braces or callipers or even for bespoke footwear. The benefits of using a walking stick are often overlooked.

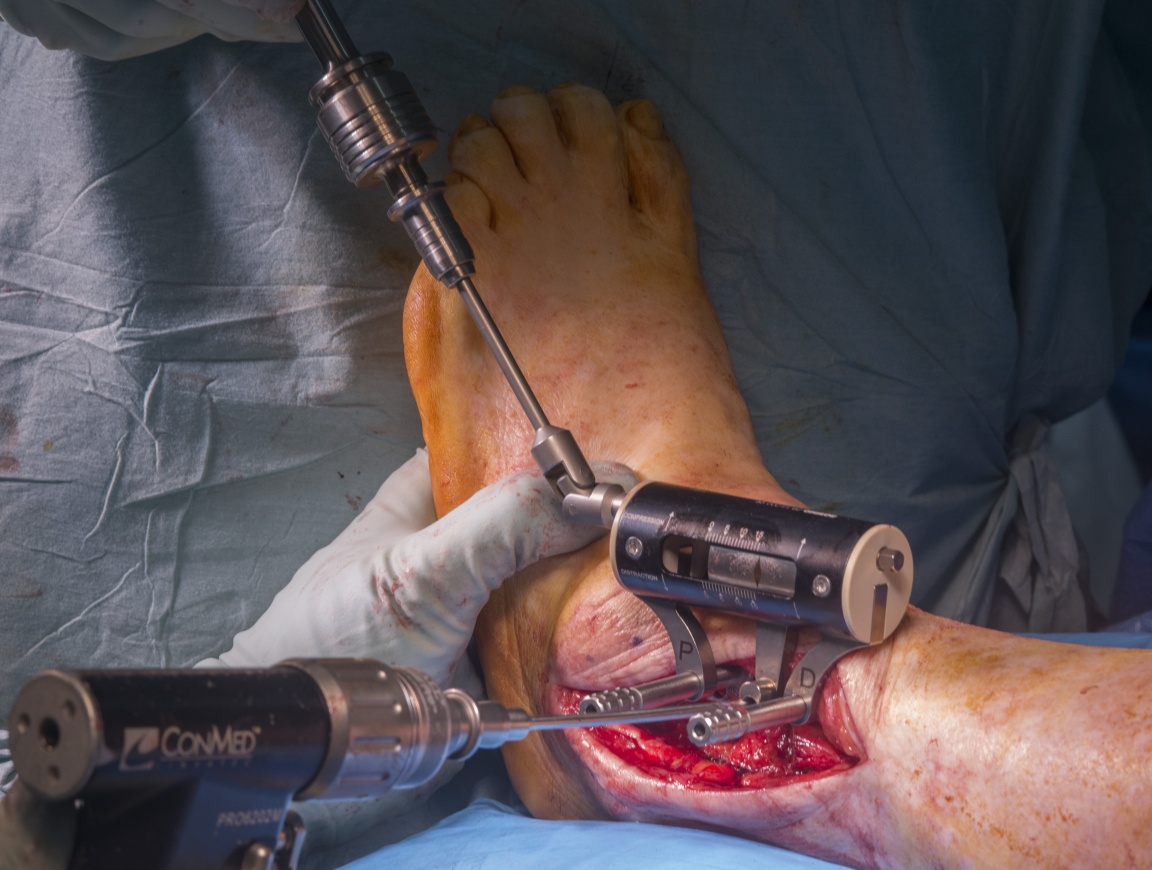
Patient positioning is at the discretion of the surgeon and may be governed by the specifics of the case, for instance the need for easy access to the medial aspect of the ankle. When positioning the patient in a supine position, it is recommended that a sandbag is placed under the ipsilateral buttock to aid access to the lateral hind foot. A pack of drapes under the calf lifts the ankle of the operating table and can provide easier access to the posterolateral aspect of the ankle during the procedure. In cases where the surgeon is operating alone, the procedure is straightforward if the surgeon stands and the patient lies in a full lateral position with appropriate supports stabilising the patient.

Fluoroscopy should be available with an image intensifier and a trained radiographer.

A single does of appropriate intravenous antibiotics are administered prophylactically and, in my practise, a thigh tourniquet and exclusion drape are applied. The limb is prepared with Chlorhexidine from toes to tourniquet. In the following case, owing to skin sensitivity, the patient was prepared with alcoholic Betadine.

A 60 year old lady presented with several years of left ankle pain and associated swelling, worse with bearing weight and eased with rest and ankle length shoes. During early adulthood, she had been diagnosed with Charcot-Marie-Tooth disease that had not required any surgical intervention. About 15 years ago, she had sustained a shear fracture of her medial malleolus that had been successfully treated by open reduction and buttress plating fixation. A hindfoot varus deformity is a risk factor for this fracture pattern. As is apparent from these weight-bearing images, she had an associated varus hindfoot deformity of approximately 40 degrees.

Further examination revealed a mild cavus deformity. There remained some flexibility within the first ray plantaris component of the cavus deformity. Ankle dorsiflexion was limited but subtalar motion was free of pain and both plain film and CT imaging did not reveal significant subtalar arthropathy.

Position the patient supine on the operating table.The patient was positioned supine to allow easy access to the medial side of the ankle in order to facilitate removal of the previous hardware used for internal fixation. This was performed but not photographed and the wounds were closed prior to commencing the open ankle fusion.

The boundaries of the distal fibula are palpated and marked with a pen. A line is marked on the skin along the axis of the shaft of the fibula as far distal as the tip to the lateral malleolus.The boundaries of the distal fibula are palpated and marked with the dotted line. A line is marked on the skin along the axis of the shaft of the fibula as far distal as the tip to the lateral malleolus.

In line with the skin incision, sharp dissection is performed down to the fibula. The periosteum is incised in line with the incision and preserved as a layer.With haemostasis, the sharp dissection is continued down to the fibula. The periosteum of the fibula is incised in line with the skin incision and reflected as one layer as this will provide a clear layer for deep closure at the end of the procedure [A].

The superficial peroneal nerve is identified and preserved.Care is taken to avoid injuring the superficial peroneal nerve. Although its course is variable, it lies close to the anterior aspect of the shaft of the fibula at the proximal extent of the incision.

The distal fibula is skeletalised.The distal fibula is skeletalised with sharp dissection. It is useful to divide all of the lateral ligament complex and to reflect all deep tissues such as the interosseous membrane and peroneal tendons from the shaft of the fibula.

The proximal extent of the osteotomy is about 7cm from the tip of the lateral malleolus and an oblique cut is made in the fibula.At this point the osteotomy of the fibula is planned by marking the shaft at least 7cm from the tip of lateral malleolus. Using a small saw blade (in this case 1cm width), an oblique osteotomy is fashioned with the retractors protecting the deep structures from injury. Resection of the fibula at this level will permit sufficient room for seating the tibial section of the Ankle Fix plate.
Alternatively, should the surgeon require morcellised bone graft, the distal fibula can be reamed using the smallest acetabular reamer to generate this graft prior to performing the osteotomy and removing the fibula.

The fibula is mobilised with an osteotome and ligamentous attachments are divided.Using a large osteotome, the distal fibula fragment can be mobilised by passing the osteotome across the syndesmosis.

The bed of the fibula should be meticulously checked for haemostasis.Once the fibula is removed, it is imperative to check the bed of the removed fibula as there is always a vessel here [A] that needs cauterising formally. It is one of the vessels, arising from the peroneal artery, to supply the muscle belly of flexor hallucis longus and it can be the source of a haematoma if not properly addressed. Given the large potential space left by the resected fibula, any haematoma can compromise the surgical wound.

The correct side and length of the plate is selected.This is the small, left Ankle Fix 4.0 plate. It consists of two sections: part of the plate that articulates with the lateral wall of the body of the talus [A] and a part that seats along the lateral shaft of the distal tibia [B] with a clear ridge delineating the two sections. There are 3 holes in the plate to allow temporary anchorage of the plate to the arthrodesis site with K-wires.
The long oval hole allows compression to be applied across the plate. The screw holes allow both locking and standard screw placement.
The plate is sided for left and right ankles and comes in small and large sizes with the larger size providing two more holes in the talar footprint of the plate. In most cases, the smaller plate suffices.
In cases requiring tibio-talo-calcaneal fusion, this plating system caters for this eventuality with the Ankle Fix+ which has a calcaneal section added to the distal aspect of the plate.

Filling each of the screw holes with the locking screws, this picture of the deep surface of the Ankle Fix 4.0 plate clearly shows the divergence within the screw configuration for the talar section of the plate and the convergence of the screws within the tibial section of the plate. This makes a construct with a very high pull-out strength which is of value in poor bone.

Remove any osteophytes that prevent seeing of the plate.The small, left Ankle Fix plate is used in this case. Therefore, the next stage of the procedure is to consider how best to contour the lateral aspect of the ankle to allow the plate to seat. Although the plate does not need to sit snugly on to the bone, it is more mechanically advantageous to have the plate seated as close as possible. This has to be achieved by sculpting the lateral aspect of the ankle rather than by bending the plate.
Quite often, there is an osteophyte [A] lying on the lateral process of the talus. This should be removed.

The incisura may need to be fashioned in order to best seat the plate.Similarly, the morphology of the incisura is very variable and quite often, the anterior lip needs resecting in order to accommodate the plate [A]. This is best achieved with an osteotome.

Anterior dissection across the tibial plafond allows access to remove any anterior osteophytes.Dissecting anteriorly allows access to view and remove anterior osteophytes primarily from the distal tibia but also from the neck of the talus. These need to be resected especially if correcting an equinus component to any deformity.

The posterior capsule is reflected off the posterior malleolus.Dissection posteriorly proceeds by elevating the tissues away from the posterior malleolus in preparation for application of the “home run” screw as demonstrated later in this case.

The ankle is then distracted with self-retainers.The ankle joint is then mobilised and a Hintermann self-retaining distractor is applied across the ankle. This works best with 2mm K-wires passed into the body of the talus and the tibial plafond. I bend the wires to 90 degrees or more to “lock” the distractor against the bone and so that the wires do not obstruct my hand movements. The distractor can be further angled by bending the wires at the bone-distractor interface to improve vision across the joint. In addition, the distractor can be rotated by the assistant to alter the views afforded across the surfaces of the tibial plafond and the talus.

My personal preference for joint surface preparation is to use a flexible chisel with a bevelled blade to remove articular cartilage and bone. The blades come in a range of sizes that are attached to the body of the instrument using an Allen key.
Although time-consuming, with careful removal of articular cartilage and bone, I find it a much more forgiving way of preparing a joint for arthrodesis than the exacting method of executing an accurate flat-flat cut as it permits subtle adjustments to the position of arthrodesis. Also, rather than using a burr or saw, this method does not generate heat and potential bone necrosis.

The joint surfaces are resected using flexible chisels to prepare concentric surfaces.The flexible chisel is then used to remove articular cartilage from both sides of the joint.

The chisel should remove enough material to expose bleeding sub-chondral bone from talus.

The self-retainers are then removed.Similarly, the chisel should remove enough material to expose bleeding sub-chondral bone from tibial plafond. Note the “petalling” of the surface of the prepared tibial plafond as evidenced by the parallel grooves cut with the chisel into the surface of the bone. This encourages bleeding and fronds of bone to sit in the fusion site.
Once this has been achieved, the Hintermann is removed.

The “home run” screw guide wire is then placed onto the surface of the posterior malleolus.Now the first step in fixation: the “home run” screw. I ask for the 3.2mm threaded guide wire for use with a 6.5mm cannulated screw system (Stryker ASNIS) to be given to me in my hand, without the hand piece of the drill. I can then pass this through the skin and see it lying directly onto the posterior malleolus. This allows me to set the optimal angle to drive this wire through the posterior malleolus and along the axis of the talus to lie short of the talo-navicular joint.

The position of ankle arthrodesis is achieved and the guide wire advanced into the talus.Once happy with the angulation of the wire, the optimal position of the ankle arthrodesis is held by the assistant and, under power, the wire is driven across the ankle joint.
The optimal position of ankle arthrodesis is a neutral, plantigrade foot (neither dorsiflexion nor plantarflexion) in 5 degrees of valgus and between 5-10 degrees of external rotation. Tips to try and achieve this are as follows: firstly, I always prep above the knee so that I can readily identify the tibial tubercle. I find that the rotational component is easiest to reference from this landmark aligning with the second ray. With a conscious decision to eliminate protraction or retraction, I reduce the talus in the mortise and bend the knee to 90 degrees to eliminate any pull from the gastro-soleus. Whist doing this, I cup my hand around the calcaneus and manipulate the heel into valgus. This latter manoeuvre is key when reducing the varus (most common) deformity in arthritis. Once the ideal position is attained, the guide wire is then passed to secure it.

The position of this wire is checked using fluoroscopy.The position of this guide wire is then checked fluoroscopically on A-P and lateral ankle views.

The position of the guide wire is also checked on the D-P view of the foot.

The length of screw is then decided by measuring off the guide wire. Over-drilling proceeds and then screw inserted to lag the ankle.The skin next to the guide wire is incised to allow instrumentation and the screw length is then determined with the measure. After drilling the appropriate length, taking care not to breach the talo-navicular joint, a partially-threaded screw and washer are passed until the washer lies flush on the posterior malleolus. This can be appreciated under direct vision through the lateral wound and the position confirmed on the image intensifier. It is important that the screw threads lie solely in the talus. Quite often, the application of this screw has the effect of reducing the talus posteriorly into the mortise. Biomechanically, this is the most robust of all screw positions in ankle fusion.

The Ankle Fix 4.0 plate is then placed on the lateral aspect of the ankle and temporarily fixed with K-wires.At this point the Ankle Fix plate is placed to lie with the talar component over the lateral talus and secured temporarily with two 1.6mm K-wires passed through the tibial section of the plate. The plate will act as a neutralisation device but, in cases of severe varus deformity, further compression can be applied to the plate to improve compression and maintain the deformity correction.

Using black drill sleeves, locking screws are applied to the talus.The drill sleeve with a black circumferential band is locked into the talar component of the plate and, in turn, each locking screw is applied to the plate. Because the screws in the talar component are divergent, it is not possible to apply more than one drill sleeve at a time as the sleeves impinge on each other.

This fluoroscopic image shows the four screws in the talus, the “home run” screw and the K-wires holding the plate in position. It is one of the useful views to reassure the surgeon that the locking screws do not breach the posterior facet of the subtalar joint.

The temporary K-wires are then removed. This picture demonstrates the external compression device linked to the Ankle Fix 4.0 plate via two drill sleeves and a 5mm Schanz pin passing through the sliding silver coloured gantry encased in the black cylindrical body. Note the Schanz pin passes through the oval hole within the plate.

The external compression device is attached to the plate.The two temporary K-wires are then removed.

For further compression, the external compression device is attached to the tibial component of the plate using two drill sleeves with the circumferential red band [A]. The compressor should be pushed as close to the patient so as to gain as much mechanical advantage in applying the compression.
Note the drill sleeve on a gantry attached to the body of the compressor with its visible gauge [B]. On the end of the body of the compressor is a hexagonal bolt that can be turned to move the gantried sleeve within the body of the compressor [C].

The drill sleeve on the gantry is moved to lie proximally within the oval hole of the plate.The drill sleeve on the gantry is then moved to lie at the proximal extent of the oval hole in the tibial component of the plate by turning the T-handle [A] attached to the hexagonal bolt on the end of the body of the compressor. The arrow on the gauge moves with the sleeve [B].
Once the drill sleeve is lying proximally in the oval hole, a 5mm Schanz pin can then be drilled across two cortices of the tibial shaft [C].

A 5mm Schanz pin is then placed through the compression device.Compression is then applied by turning the the hexagonal bolt with the T-handle. The amount of “travel” of the gantry can be appreciated visually by looking at the gauge, but the degree of compression is largely gauged by feel and surgical discretion. As more turns are applied to the hexagonal bolt, there is sufficient feedback from the T-handle. Never be tempted to “go that extra turn”!

Using the T-handle, external compression is applied across the ankle.One other clear indication that compression has been achieved is that the Schanz pin is no longer parallel to the locking sleeves.

Further locking sleeves are applied to the tibial component of the plate.Leaving the compressor in place, further locking sleeves are then applied to the plate and two further screws are applied, this time to the tibial section of the plate.

Using the locking sleeves, screws are applied into the tibia.Only once these screws are placed can the compressor be removed. In order to remove the compressor, the hexagonal bolts need to be undone and the Schanz pin returns to its position parallel to the locking sleeves.
The Schanz pin and the locking sleeves are removed freeing the compressor.

The external compressor is then released and removed. Further screws are applied to the tibia.Using the locking sleeves further screws are applied to the rest of the plate.

The position of all hardware is then checked on the image intesnifier.Final A-P images show the position of the hardware.

Final lateral images also confirm no hardware lies within the posterior facet of the subtalar joint.

Deep closure of the periosteum and skin. Plaster of Paris slabs are applied.The periosteal layer is then closed over the plate with 2/0 vicryl and 3/0 monocryl sutures are applied to the skin. A temporary cast consisting of a plaster of Paris back slab and stirrup are applied over the dressings.

The patient is in the below the knee back slab for the first two weeks after surgery. At two weeks, the wounds are inspected and re-dressed and a complete, lightweight below-the-knee cast is applied for a further four weeks. Weight bearing is not permitted for the first six weeks after surgery unless transfers are necessary and in my practice, rivaroxaban is prescribed for this duration to prevent thrombo-embolic events. At six weeks, the patient can commence weight bearing in a walker boot which can be removed for sleeping. At twelve weeks, the ankle fusion is assessed radiographically with standing views in two planes before abandoning further immobilisation. There is no need for physiotherapy other than to help patients manage walking aids such as a Zimmer frame. If there is any doubt about the fusion mass on plain radiographic imaging, then further imaging with CT may be helpful.

A new lateral fixed angle locking ankle arthrodesis plate: technique and rate of union. Davies MB, Blundell CM Tech Foot Ankle Surg 2017; 16(4):199-206.
The plate designers assess their experience of more than 80 open ankle fusions using the AnkleFix 4.0 plate for variable degrees of deformity in all planes and determine that their rates of union and other complication rates are comparable with those in the literature. The review covers a heterogenous mix of cases with significant deformity, in revision ankle fusions and dealing with bone loss after total ankle replacement.
Use of a proximal humeral locking plate for complex ankle and hindfoot fusion. Shearman AD, Eleftheriou KI, Patel A et al. J Foot Ankle Surg 2016; 55(3): 612-8.
In a small retrospective study looking at a group of patients with hindfoot fusions including ankle fusion surgery. They audited the concept of a fixed angled locking plate used for ankle arthrodesis and had similar rates of union and complications to Davies & Blundell.
Salvage arthrodesis after ankle replacement. Berkowitz MJ, Sanders RW, Walling AK. Foot Ankle Clin 2012; 4: 725-740.
This is an excellent summary of how to deal with the issue of bone loss in complex hindfoot fusions especially after ankle replacement. The authors suggest a useful algorithm for how to decide when to spare the subtalar joint after a failed total ankle replacement although they use an anterior ankle fusion plate without locked screws.
Revision arthrodesis of the ankle: a 4 cannulated screw compression fixation technique. Tulner S, Klinkenbijl M, Albers G. Acta Orthop 2011; 82(2): 250-2.
Although this paper is primarily written to present a technique, it is a useful paper in reviewing the literature for revision ankle arthrodesis. There are no studies with more than 13 patients with all studies using a multiplicity of techniques with/without bone grafting achieving similar rates of fusion to the Ankle Fix 4.0.
Arthroscopic ankle arthrodesis. Gougoulias NE, Agathangelidis FG, Parsons SW. Foot Ankle Int 2007; 28(6): 695-706.
A retrospective study comparing the outcome of two large groups of patients with either <15 degrees versus >15 degrees of deformity. There was no significant difference between the clinical outcomes or complication rates between the two. However, the lead author’s results may not translate to less experienced surgeons.


Reference

  • orthoracle.com
Dark mode powered by Night Eye