
Learn the Brostrom lateral ligament reconstruction using JuggerKnot soft tissue anchor(Zimmer-Biomet) surgical technique with step by step instructions on OrthOracle. Our e-learning platform contains high resolution images and a certified CME of the Brostrom lateral ligament reconstruction using JuggerKnot soft tissue anchor(Zimmer-Biomet) surgical procedure.
It is estimated that, in the UK, there are approximately 7000 ankle sprains per day. 85% of these sprains will involve the anterior talo-fibular (ATFL) and calcaneo-fibular (CFL) ligaments which are the principal lateral ligament restraints. Most will resolve with little input other than basic remedies such as rest, ice, compression and elevation. In those cases that do not recover quickly, it is either because they have been subjected to repeated sprains or there is a concomitant pathology such as an osteochondral lesions of the talus, peroneal tendon tears or peroneal retinaculum injury.
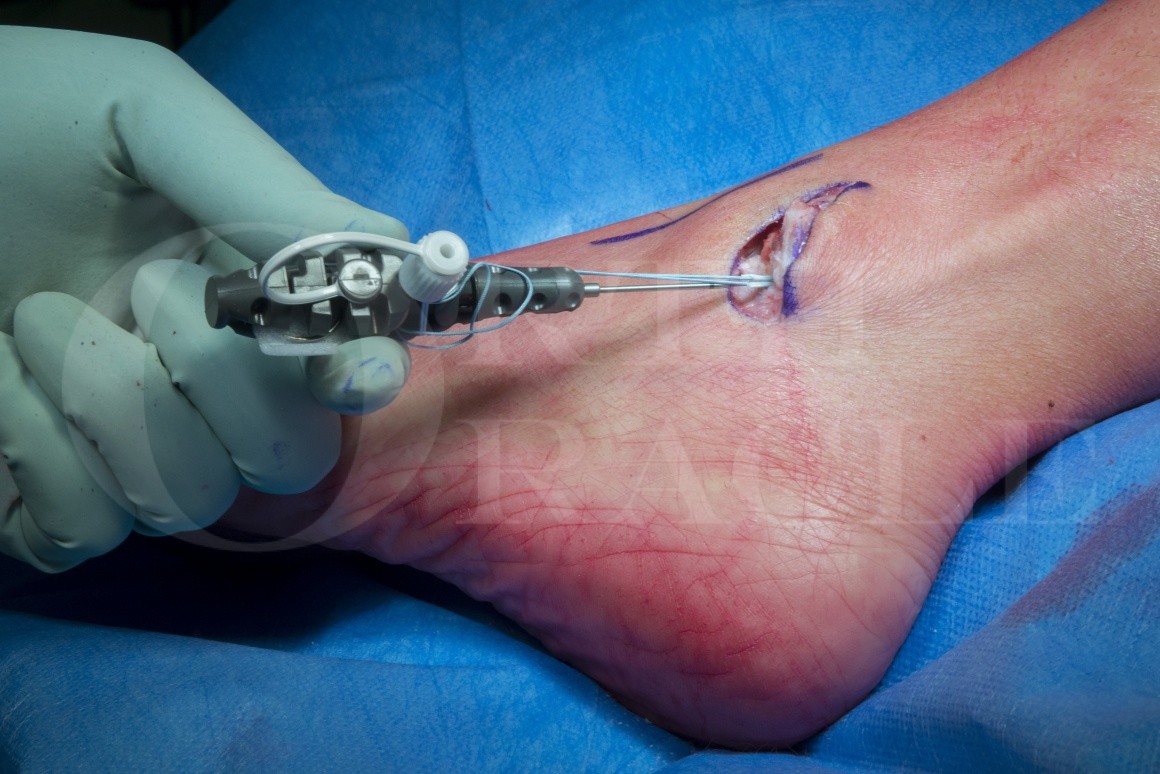
In those cases where non-operative treatment fails, surgical intervention may be necessary with the aim of restoring ankle stability by repair of the lateral ligament complex which can be done using the Zimmer Biomet JuggerKnot soft (suture) anchor. One surgical technique that has continued good results was first described by Brostrom in 1966, whereby the ATFL and CFL are imbricated, with an additional modification by Gould in 1980 which detailed additional imbrication of the inferior extensor retinaculum (IER). This technique forms the mainstay of anatomic ankle reconstruction techniques not only because of the high success rates but also because of low rates of complication such as ankle stiffness and subtalar arthritis.
The advantage of the Zimmer Biomet JuggerKnot soft tissue anchor system is that it offers excellent pull-out strength at the bone-anchor interface with a minimal footprint in the bone.

Indications
Since most acute ankle sprains will settle with basic non-operative measures, most surgeons agree that there is no need to perform an acute surgical repair of the lateral ankle ligaments.
The role of a Brostrom-Gould procedure is in the treatment of chronic ankle instability. The textbooks describe two groups of patients with chronic ankle instability: mechanical and functional. In mechanical instability there is an excess of ankle motion beyond the physiological range. In functional instability, the range of ankle motion is deemed normal but the voluntary control of that range of motion is impaired. In reality, it is difficult to categorise patients and most patients will have a combination of both. Therefore, it is imperative that patients will have had a robust programme of physiotherapy intervention because improved voluntary control of the ankle will often be successful in treating the instability.
Only when patients have failed to progress with targeted physiotherapy input should surgery be considered.
Symptoms & Examination
Patients with chronic ankle instability present with a number of symptoms. The two most common symptoms are instability and pain, but sometimes a locking sensation may be a feature. Clearly, the onset and duration of symptoms should be noted. It takes a great deal of skilled questioning of the patient to elicit the key features of both of these primary symptoms. Patients often tell you that their ankle “gives way” or that they “don’t trust” their ankle. It is important to determine when the ankle feels unstable by asking about the surfaces and camber and the activities that induce the instability. If someone only gives way on their ankle once a year when they walk on cobbled stones then surgery is not an appropriate solution. To direct questioning, pain may only occur after an episode of giving way, suggesting that it is the incompetence of the ligaments that is the prime issue. The presence of associated symptoms such as pain, swelling and a feeling of structures dislocating should be noted. Pain and swelling may be an indicator of intra-articular pathology. Pain that precedes the ankle giving way or a feeling of locking may indicate an osteo-chondral lesion. A sensation or observation of the frank dislocation of the peroneal tendons also makes patients feel unstable and this pathology will need addressing in its own right.
It is also important to determine any factors that improve the ankle instability. For instance, patients may have tried bracing their ankle. It is worthwhile asking them to describe the braces that they have tried because there are a variety of braces that are freely available on the market. Some are not much more supportive than a sock yet others have rigid medial and lateral integral plates with a long working length to control the lever arm. Most patients will feel most stable by avoiding surfaces and activities that induce their symptoms.
Lastly, a full history should include a detailed enquiry into the exercise regimes that have been undertaken with physiotherapists. It is not uncommon for patients to have simply been issued with an exercise sheet alone. Others will have been through a full, supervised programme with a physiotherapist involving proprioceptive training on a wobble board.
Examination should include an assessment for signs of systemic ligamentous laxity and some surgeons will routinely apply a Beighton’s score to grade this. Knowledge of the patient’s Body Mass Index (BMI) is necessary. It is useful to watch the patient walk, noting the position of heel strike and observing any varus thrusting of the ankle. From behind, a standing assessment of the limb alignment is mandatory especially to look for a cavus foot and for various attitude of the hindfoot. Any medialisation of the centre of gravity through the ankle will put the lateral ligaments at a biomechanical disadvantage and will need to be addressed at the time of surgery. A detailed assessment of motor power within the foot and ankle is helpful especially in the presence of a cavovarus foot.
With the patient seated, palpation may reveal tender areas that may raise the suspicion of an intra-articular pathology. The peronei may also be tender and may be subluxatable. Some patients may even be able to reproduce peroneal tendon subluxation or it may be inferred by an apprehension test. Testing for true instability is most meaningful when each specific test is compared to the contralateral side. When performing a drawer test, an absence of a firm end-point is indicative of considerable mechanical instability. Performing this test in dorsiflexion and plantar flexion is supposed to help differentiate whether or not the CFL is attenuated but I do not find this useful. Some patients who have an abnormal drawer sign may tell you that performing this manoeuvre reproduces their pain. If the talus can be tilted into varus when the foot is plantigrade, then this indicated the lateral ligaments are incompetent.
Investigation
Weight bearing plain radiographs are mandated. Clearly, they will demonstrate the presence of degenerative change but in terms of managing ankle instability, it is useful to specifically look for osteo-chondral lesions within the dome of the talus. It is useful to look for evidence of an avulsed piece of bone from the distal fibula not only because this suggests a previous lateral ligament injury, but also because there is some evidence to suggest that the results of a Brostrom-Gould repair are not as good in these patients. This is probably because the avulsed fragment requires excision and leaves a rent in the cuff of ligament making imbrication more difficult.
Magnetic resonance imaging is also mandated because this will give clear imaging of osteo-chondral lesions within the ankle mortise. Ultrasound provides the most accurate way of assessing the integrity of the peroneal tendons and the retinaculum that anchors them adjacent to the fibula.
Some surgeons find the use of stress radiographs helpful, but I have found this to be of little value in my practice with the crucial information coming from an accurate history and examination coupled with the aforementioned diagnostic imaging.
Operative alternatives
By and large, the role of non-anatomic procedures to restore ankle stability by tenodesing the peroneal tendons in various ways (such as Watson-Jones and Evans procedures) are largely consigned to history. Other anatomic lateral ligament reconstructive procedures that can be used are more technically challenging and involve the use of autograft or allograft tendons or synthetic ligaments. These are routed into bone tunnels positioned in the talus, fibula and calcaneus to mimic the axes of the ATFL and CFL and secured with interference screws. In the main, these are excellent options for failed Brostrom-Gould procedures, in patients with a high BMI or in those with significant hindfoot varus. Synthetic ligaments are being more widely used to augment Brostrom-Gould procedures but there are no long-term studies supporting their use. Arthroscopic Brostrom procedures have also gained some traction but they technically challenging, with a long and steep learning curve and their results are not better than open techniques with some authors reporting higher complication rates.
Contraindications
This operation requires the patient to be actively engaged with their treatment because the surgery is the first step in a rehabilitation programme. Patients who are incapable of making regular physiotherapy visits post-operatively should not undergo an operation. Logical contra-indications include the presence of active infection.
Some of the contra-indications to a standard Brostrom-Gould are logical tenets of orthopaedic surgery. For instance, the procedure relies on the need for an individual to respond to proprioceptive training, therefore any neurological compromise that could affect this means that the procedure is unlikely to be successful. The classic Brostrom-Gould is contra-indicated in cases of systemic laxity. It is common sense not to perform soft tissue reconstructive procedures about a joint that is degenerate.
Non-operative intervention
As previously alluded to, chronic ankle instability can be well managed by sensible bracing and physiotherapy. Therefore, a multi-disciplinary team of orthotists and physiotherapists are invaluable in helping you manage your patients.

If I plan to perform a concurrent ankle arthroscopy and Brostrom’s procedure, then I will position the patient in a supine position primarily to cater for the arthroscopic instruments. However, in the absence of any medial intra-articular pathology, I always position my patients on their side for the Brostrom procedure with the affected side uppermost. In this position, the views afforded of the lateral ligaments are optimised and it is possible to perform the operation by being seated at the foot of the operating table. In addition, if you need to perform a lateralising calcaneal osteotomy, lying the patient in a full lateral position facilitates the surgical approach.
I support the patient with rigid, well-padded supports positioned against the lumbo-sacral junction and anterior superior iliac spines. I place a pillow between the two legs. A thigh tourniquet and exclusion drape are required. The patient has a single dose of appropriate prophylactic antibiotics before the tourniquet is inflated.


The plaster of Paris back slabs stay in place for 2 weeks during which time, the patient is not permitted to bear weight. This is to allow the surgical wounds to settle. At the 2 week dressing appointment, the wounds are checked and, if dry and healing, the patient is then allowed to commence bearing weight using a walker boot. At this stage, the physiotherapists encourage ankle range of motion exercises that can be performed when seated at home with the boot removed. At the 6 week review, the boot is abandoned and the patient returns to normal footwear and commences a regular physiotherapy programme working on ankle and subtalar range of motion and proprioceptive training.
Usually by 12 weeks, patients feel much more stable and are discharged from medical review but remain under the supervision of the physiotherapists. I allow patients to re-commence a graduated training regime with their sports clubs at this stage. In patients achieving the best results, they may be back playing football or rugby at 16 weeks post-surgery.
During the first two weeks after surgery, rivaroxaban is given to prevent thrombo-embolic events. This is ceased with commencing weight bearing and ankle range of motion exercises.

Twenty-six-year results after Brostrom procedure for chronic lateral ankle instability. Bell SJ, Mologne TS, Sitler DF, Cox JS. Am J Sports Med 2006; 34(6): 975-978.
This paper has the longest follow-up of the Brostrom procedure in two thirds of the original cohort of study patients. This group of patients underwent a pure Brostrom imbrication of the ligaments with no Gould modification. When required, the CFL was also repaired. Within this group, good and excellent functional results were achieved in a very high percentage of patients.
Long-term results after modified Brostrom procedure without calcaneofibular ligament reconstruction. Lee KT, Park YU, Kim JS et al. Foot Ankle Int 2011; 32: 153-7.
In this paper, patients were treated with a Brostrom imbrication and a Gould modification but no repair of the CFL. A high proportion of these patients were high level athletes and with a mean follow-up of more than a decade they achieved excellent outcomes.
Arthroscopic repair of chronic lateral ankle instability. Corte-Real NM, Moreira RM. Foot Ankle Int 2009; 30(3): 213-7.
With 2 year follow up data on a reasonable sized cohort of patients, this very honest paper details the complications from the authors’ experiences of this technique. They had equivalent successful outcomes compared to open repair techniques and the 10% complication rate consisted of the same complications seen using open repair techniques: recurrent instability, superficial peroneal nerve injury and deep vein thrombosis.
Reference
- orthoracle.com


