///

Diagnostic Wrist Arthroscopy (using Acumed ARC Tower )

Learn the Diagnostic Wrist Arthroscopy (using Acumed ARC Tower ) surgical technique with step by step instructions on OrthOracle. Our e-learning platform contains high resolution images and a certified CME of the Diagnostic Wrist Arthroscopy (using Acumed ARC Tower ) surgical procedure.
This is a detailed step by step instruction through the set up and procedure of a diagnostic wrist arthroscopy using the Acumed TM ARC Tower traction system.
Wrist arthroscopy is an expanding speciality and with the improvement in diagnostics with 3T MRI scanning it is being used less for diagnostic procedures and more for definitive surgical interventions.
Diagnostic wrist arthroscopy is an excellent way to become familiar with the procedure and develop skills to advance onto more invasive procedures using wrist arthroscopy.
If a diagnostic arthroscopy is used to confirm a MRI or clinical finding then an further open or arthroscopic procedure can be often performed at the same sitting if the patient has been appropriately consented.
Despite the improvement in MRI scanning and interpretation, wrist arthroscopy is still the gold standard for many conditions although the invasive nature and cost of the procedure certainly has some disadvantages compared with MRI. Conditions particularly difficult to determine on MRI are Luno-triquetral interosseous ligament (LTIL) injuries and injuries causing symptomatic mid-carpal instability. Bony injuries are much better seen on MRI and unlikely to be missed due to the oedema seen in the bone.
Following a diagnostic wrist arthroscopy, patients are usually placed in plaster cast for 1 week for comfort then allowed to mobilise to reduced stiffness. The individual post-operative rehabilitation or further intervention will clearly depend on the arthroscopic findings and patient wishes.
Complications in diagnostic wrist arthroscopy or rare and usually minor however it has been shown that when surgeons are learning this skill, tendon injuries and iatrogenic cartilage injuries are more frequent.

Indications
A diagnostic wrist arthroscopy is performed to confirm a clinical or radiological finding and to plan further interventions. These further interventions may be immediate arthroscopic or open surgery, a period of immobilisation or physiotherapy with or without splinting.
Wrist arthroscopy is the gold standard for assessing specific intra-articular abnormalities such as cartilage damage (to diagnose a pain source or plan salvage surgery such as limited wrist fusions), ligament injuries (particularly interosseous carpal ligaments – scapholunate and luno-triquetral) TFCC (triangular fibrocartilage complex) injuries, intra-articular loose bodies or ganglia, synovitis and adhesions.
Wrist arthroscopy is also useful to exclude these abnormalities in cases of mid-carpal instability where the pathology may be ligament laxity and muscle weakness rather than ligament rupture.
Wrist arthroscopy can also be used as an adjunct to other surgical procedures (arthroscopic assisted) such as intra-articular distal radius or scaphoid fracture fixations to check reduction during and after fixation.
Wrist arthroscopy can also be used beyond the diagnostic procedure in interosseous ligament repairs or reconstructions, limited wrist fusions (STT – scapho-trapezoid-trapezium, 4CF – four corner fusion), capsular shrinkage (for midcarpal instability or lax ligaments), bony resection (radial styloidectomy, distal scaphoid excision, proximal hamate excision, Wafer procedure of the ulna), TFCC repairs or reconstructions, joint debridement (synovectomy, arthrolysis or joint washout), DRUJ (distal radioulnar joint) debridement and assessment and ganglia excision.
Symptoms
The symptoms experienced will depend on the underlying pathology however in the main the operation is undertaken for pain or dysfunction. In acute settings it is usually performed to diagnose ligament tear and in the more chronic setting the pathologies mentioned in the indications section.
Examination
Examination to proceed a diagnostic wrist arthroscopy will be a focused wrist examination.
If there are clinical concerns about limitation or pain during pronation and supination the proximal radio-ulna joint must also be examined.
The contra-lateral wrist is examined initially for two reasons. One to discover what is normal for the patient as laxity, clicks and clunks can be normal if asymptomatic. Secondly as some of the examination tests stress the wrist in unusual ways, the patient is then aware what to expect and what is normal (some tests such as Lichtman mid-carpal shift test can be uncomfortable or a ‘strange feeling’ on a normal wrist – especially if there is a positive finding).
The problematic joint is assessed for swelling, deformity and previous scars on inspection.
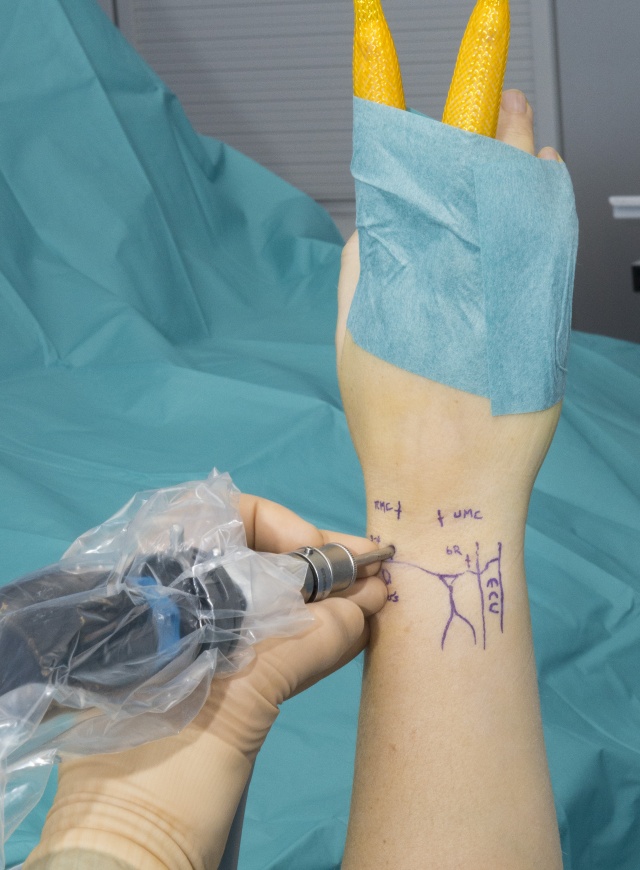
It is then palpated systematically usually starting away from the most painful site and progressing around the wrist generally over the radio-carpal, mid-carpal and distal radio-ulna joint lines but also more specifically over bony prominences such as the scaphoid tubercle, pisiform and hook of hamate. Palpation may also yield more information with different wrist positioning i.e. in flexion more of the scapho-lunate ligament is exposed to palpation and in ulnar deviation more of the waist of the scaphoid is palpable beyond the radial styloid. On the ulna side of the wrist tenderness over the Extensor carpi ulnaris (ECU) may actually be deeper pain within the TFCC and can be differentiated by palpation in supination where the tendon lies more dorsally and pronation where it lies more ulnarly.
Following palpation the range of movement is assessed – flexion (75), extension (70), supination (85), pronation (70) and radial (20) and ulnar deviation (35) – normal ranges in degree provided in brackets.
Special tests then can be performed based on clinical suspicion-
Kirk-Waston test for scapholunate instability (also promotes pain but no clunk in STT arthritis)
Kleinman shear test and Reagan test for Luno-triquetral instability
Lichtman midcarpal shift test for midcarpal instability.
Pisiform pressure to elicit symptom improvement for mid-carpal instability
DRUJ squeeze in supination and pronation promotes pain in DRUJ arthritis/synovitis
DRUJ stability testing for TFCC tear (including Piano key test)
Ulna impaction or grind tests for TFCC injuries and synovitis
Piso-triquetral shearing for arthritis
Ice-cream scoop movement to test for ECU pain/subluxation
It may be difficult to elicit a positive result in some of these tests especially in the acute settign if pain is a major issue and the patient’s wrist is not relaxed during the examination.
Investigations
Investigations include plain PA and lateral radiographs of the wrist with the addition of a clenched fist view if a scapholunate ligament rupture is suspected.
On these radiograph we are looking for arthritis, fractures, ligament injuries (identified with increase interosseous gaps on the PA and clenched fist views and scapho-lunate and capito-lunate angles on the lateral view).
An MRI scan (preferable 3T) is the next investigation for many patients as this can identify occult fractures and ligament injuries and other soft tissue abnormalities such as synovitis and ganglia.
If an MRI in contra-indicated due to patient co-morbidities or claustrophobia then a CT scan or SPECT scan (single-photon emission computed tomography) is useful for identifying pathology.
Non-operative Management
Non-operative management will depend completely on the pathology and symptoms.
Diagnostic wrist arthroscopy is used in acute conditions for a diagnosis after trauma or in chronic conditions with continue pain or instability.
For acute patients analgesia and splinting usually precede the arthroscopy. For chronic patients depending on the problem then analgesia, splinting, activity modification, physiotherapy with wrist strengthening or a steroid joint injection may be useful in symptom control.
For mid-carpal instability patients, a wrist splint which applies Pisiform pressure to support the ulnar carpus can also be useful.
Alternative operative Management
For diagnostic arthroscopy there is no surgical alternative.
Contraindications
The only contra-indications to wrist arthroscopy are a patient who is not fit enough for the procedure, a wrist which it is not possible or extremely difficult to scope due to tightness or stiffness (major surgery previously or inexperience of surgeon), anti-coagulation therapy which is unsafe to stop and ongoing chronic regional pain syndrome (CRPS).

Pre-operative preparations and Equipment
The operation can be performed under general (GA) or regional anaesthetic.
As many procedures are undertake for possible ligament injury it is essential to perform an examination under anaesthetic (EUA) then an EUA with fluoroscopy to gain as much information as possible to aid diagnosis. The clinical examination in the outpatients department, the EUA and the operative findings are then all combined to assess what findings are clinically relevant.
NB – Only surgically treat findings which correlate with clinical findings e.g. If a patient presents with pure radial sided wrist pain and an arthroscopy finds only a TFCC tear – DO NOT TREAT – as this is not symptomatic.
A single dose of antibiotics are given pre-operatively and no thromboprophylaxis is used unless the patient is under a GA.
With experience, the duration of a diagnostic wrist arthroscopy is around 15mins however if a second procedure is going to follow the diagnosis then the duration of surgery may be much longer. Patients under axillary block often notice tourniquet discomfort between 90-120 minutes (this can be prolonged with use of local infiltration beneath the tourniquet and/or distraction techniques such as watching a film or listening to music on a portable device).
The patient is lay supine with an arm on the arm board, the arm prepped and draped, a sterile tourniquet applied, the hand held in traction and the skin markings completed PRIOR to exsanguination with a sterile Esmarch..
Kit
Arthroscopy tower or gantry, finger traps, sterile tourniquet, sterile Esmarch, OlympusTM arthroscope 30 degree (1.9, 2.4 or 2.7mm), shaver, ablator, white needle 16 gauge, adhesive tape (around base of finger traps), straight artery clip, 11 blade for knife, wrist arthroscopy probe, saline in 50ml syringe and connector to attach to arthroscopy trochar.

Following an EUA and fluoroscopy the arm is set up in the traction tower.
The arm is prepped and draped and then a sterile tourniquet applied high enough on the upper arm not to pinch when the elbow is flexed to 90 degrees.
The limb is checked for complete anaesthesia.
The pattern of draping varies greatly with the type of support used for the hand. This procedure used the ARC Tower from AcumedTM. This Tower is set up as per the manufacturers guidelines included in the SET UP section of this operation.
Once the tower is in place the upper arm is strapped to the base plate. It must be ensured that the strap does not press on the inflow pipe to the tourniquet otherwise this may prevent adequate inflation.

The hand is supported using finger traps of appropriate size on the index and middle fingers.
To prevent shear and distribute the force of the finger traps over a larger area of skin some adhesive tape (Opsite tapeTM in this photograph) is applied around the hand overlapping the finger traps and the metacarpo-phalangeal joints.

Surface markings of the radius, ulna and Lister’s tubercle are drawn.The tension of distraction is then set and the bolts tightened. Although the tension on this Tower can be read and often equates to 10lbs the tension required can be judged by stabilising the tower and feeling the forearm which should not be floppy or very tight across the wrist but should have some resistance to movement and springiness when moved.
If the tension is not set before marking the wrist the skin will move over the deep anatomy and the will markings will be inaccurate.
The wrist is then marked up to show the outline of the dorsal radius, radial styloid, dorsal ulna, ulna styloid, DRUJ and Lister’s tubercle (LT in image)

The 3-4RC, 6R, UMC and RMC portals are marked along with the ECU tendon.To complete the markings the ECU can be outlined and the 4 work horse portals marked- 3-4 Radio-carpal (RC), 6 R, Ulnar mid-carpal (UMC) and radial mid-carpal (RMC). The portals are names in relation to the extensor tendon compartments.
All 4 portals must be used in every wrist arthroscopy to confidently assess the whole wrist RC and MC joints.
Portals may be horizontal or vertical.
There is little difference however horizontal incisions are thought to be more cosmetic along Langer’s lines but may have an increased risk of tendon injury if the knife is entered too deeply.
To identify 3-4 RC portal the surgeon places their thumb on Lister’s tubercle and slides it distally around 1-1.5cm. Here can be felt a soft area. This area is quite large and overlies the dorsal lunate and dorsal capitate. If the surgeons thumb inter-phalangeal joint (IPJ) is flexed fully and the thumb nail used feel the most proximal extent of the soft area just distal to the dorsal lip of the radius this is the site for the 3-4 RC portal.
To identify 6R portal the surgeons thumb is place over the ulna head and slid distally until it drops into a soft area with the ECU tendon on the ulna aspect. This will be at the level of the TFCC therefore the portal needs to be marked about 5mm distal (just proximal to where the dorsal triquetral can be palpated).
The RMC portal is roughly 1cm distal and just to the radial aspect of the 3-4RC portal. A joint line can usually be felt at this point if the tip of the thumb nail is used as before and the site can also be confirmed by palpating the tendons of the 4th extensor compartment and dropping of their radial aspect into the soft area in line with the 2nd web space.
The UMC portal is roughly 1cm distal and just to the ulnar aspect of the 6R portal. A joint line can usually be felt at this point if the tip of the thumb nail is used as before and the site can also be confirmed by palpating the tendons of the 4th extensor compartment and dropping of their ulnar aspect into the soft area in line with the 4th web space.
If a 4-5 RC portal is required this is located at the same level as the 3-4 RC portal palpating the joint line with the tip of the thumb nail and dropping just off the ulnar aspect of the extensor tendons of the 4th compartment which can be felt crossing the wrist.

Overview of traction setup and markings.
The screen is placed at the foot of the bed in this setup however many surgeons place the stack and screen on the opposite side of the patient looking over the patient during the procedure.

The tourniquet is inflated.A sterile Esmarch is used to exsanguinate the limb and tournquet inflated to 250mmHg.

The 3-4 RC portal is made.The knife (pointy 11 blade) only pierces the skin and no deeper and the incision is around 5mm long.

A straight artery clip is used to enter the joint.
The clip is best held gripped in a fist rather than with a finger and thumb in the eyelets as this ensures the surgeon resists the temptation to spread the clip until it is in the joint. No spreading off tissue is necessary in the superficial tissues as this just creates tracks for the fluid to leak along.
The clip is passed through the skin incision, wriggled through the fat and past any superficial veins and used to feel the dorsal lip of the radius. Once the surgeon is confident of placement by feeling proximal (bone) and distally (bone) then the wrist is stabilised and the clip is aimed 10 degrees downwards and pushed into the joint. This is best done with a sharp stabbing motion to pop through the capsule rather than and gradual increase in pressure as the elasticity of the joint capsule often resists the clip with the gradual approach.
Once in the joint the clip is opened fully horizontally across the joint for 3 seconds to stretch the portal and is then closed and removed.
NB – The surgeon must keep note of the exact direction the palm is pointing when the portal is made as it needs to be pointing in this direction for all future portals to allow easier access to multiple portals simultaneously. Otherwise as the wrist is rotated the capsule fibres close around the portal and make re-entry more difficult.

The trochar then the camera is inserted into the 3-4RC portalThe trochar is then inserted with the water inlets closed, the central stylus is removed and the camera inserted into the wrist.
When learning wrist arthroscopy it is always easier to start with the light lead coming down off the scope (in the 6-o-clock position) and the buttons of the camera on the top. This ensures up on the screen is truly up and initially the camera is looking 30 degrees upwards to the proximal carpal row.
Unless the surgeon is confident with arthroscopy it is best to try and keep the camera always in the same orientation and use the adjustment of the light source to direct the view. Lifting the light lead t the 3-o-clock position will allow the surgeon to look left and 9-o-clock to look right and 12-o-clock to look down.
Fluid is not routinely used during this procedure. It can be used to rinse out a joint with thick synovial fluid or blood but is usually not required for diagnostic wrist arthroscopy.
It is important to hold the scope correctly for both comfort and dexterity.
As can be seen on the image the camera rests in the first web space with the thumb and the index finger supporting either side of the trochar and the middle and ring fingers resting on the patients wrist. Flexion and extension of the middle and ring finger allow the surgeon to enter or withdrawn the scope very accurately. If these fingers were not rested in this way the surgeon will be trying to control these fine movements with their shoulder and is likely to keep backing too far out of the wrist and exiting it accidentally. The individual surgeons grip on the scope may need to be modified slightly due to hand size.
On first entering the joint through the 3-4 portal the surgeon usually starts with the camera at the volar aspect of the wrist beneath the scapho-lunate interosseous ligament (SLIL). The scope needs to be withdrawn slightly to achieve the desired view.
The joint is then reviewed systematically.

The radio-carpal joint is assessed for any abnormalities.This image shows the view on first entering the RC joint.
1 -Long radio-lunate ligament (LRL)
2- Scaphoid
3 – SLIL
4 – Lunate
5- Ligament of Testut and Kuentz – not truly a ligament as it is more of a vascular leash (also called radio-scapho-lunate ligament)
6 – Radius

Sweeping the scope slightly radially or rotating the light source to the 3-o-clock position will provide a view over the radial aspect of the wrist. The articular surfaces are inspected for wear and the joint lining for synovitis, ligament irregularities or ganglia.
1- Radial styloid
2-Radio-scapho-capitate ligament (RSC)
3- Scaphoid
4- LRL
The short radio-lunate ligament (SRL) is usually hidden behind the ligament of Testut and Keunz and therefore not visible.

The scope will then need to be guided up the radial aspect of the joint which can be achieved easily be sweeping the scope to the radial side. However if the wrist is a little tight the scope may need to be withdrawn further to walk it across the dorsal aspect of the joint.
This view is particularly good for seeing scaphoid fractures or non-unions. The surgeon can continue to guide the scope radially and distally to the reflection of the capsule of the mid-carpal joint and the dorsal ridge of the scaphoid.
1- Joint capsule distal to radial styloid
2- Scaphoid waist

It is important to keep looking between the screen and the outside of the wrist to guide the scope especially if the surgeon loses their orientation. If this happens also check that the light source and camera buttons are reset to the starting position (buttons up, light lead down 6-o-clock) until re-orientated.
Once the radial aspect of the RC joint has been viewed the scope is moved to the ulnar aspect. To achieve this the scope must be withdrawn to the dorsal aspect of the joint and then guided along the dorsal lip of the radius behind the lunate.
This can be a difficult process, especially in tight wrists therefore this should only be attempted 2 times then STOP, remove the scope and reinsert the trochar with the central blunt tipped stylus in situ. This is then slid across the back of the wrist to the ulna aspect blindly. This is very easy due to its rounded tip and unlikely to cause a cartilage damage.
The camera is then replaced and (as demonstrated in the picture) if in the correct position the light from the scope can be seen in the ulnar aspect of the wrist.
This light not only identifies where the scope is but highlights any dorsal veins which can then be avoided when making the 6R portal.

Once viewing the ulna side of the wrist a number of structures can be identified.
1 – Lunate
2 – TFCC styloid attachment
3 – TFCC disc
4 – TFCC dorsal sulcus
5 – Dorsal capsule (site of entry of 6R portal).
On the volar aspect the fibres of the Ulno-triquetral and Ulno-lunate ligaments are difficult to identify due to the thick volar capsule in this area.

A needle is placed in at the 6R portal and location checked with the camera.After re-palpating and viewing the movement of the dorsal capsule from inside the wrist, a 16 gauge needle is inserted into the joint aiming horizontal and slightly radial to triangulate with the scope.

With the light lead in the 9-o-clock position (3-o-clock for a left wrist) the entrance of the needle is seen.
At this point if the needle enters the joint low on the edge of the TFCC or high the entry point for the skin incision can be changed accordingly.
The needle is then removed and a spot of light can be seen to guide the portal placement. The skin is then incised and artery clip inserted as previously described.

The 6R portal is made.Clip inserted and spread for 3 seconds.
NB – remember to have the palm facing the same direction as during the creation of the 3-4RC portal.
Occasionally the needle or clip will enter beneath the TFCC (especially if there is a foveal tear and the disc is elevated). This need to be identified and accounted for in portal placement.

Clip in joint – note the magnification of the clip when seen on the screen and the direction coming towards the scope to allow triangulation.

Once the clip is removed the blunt stylus from the trochar is inserted.
This only take 2 seconds and if easy then the hooked probe can then be inserted.
If the surgeon has difficulty with the blunt stylus then the hooked probe will be very difficult to insert.
It may be necessary to take a step back and use the clip to find the original portal making sure the wrist position has not changed. Do not be tempted to just create another hole in the capsule as this with create further difficulties later in the procedure, try gently to find the original portal and then remember the angle used to achieve entry for the next attempt with the stylus and hooked probe.

A hooked probe is inserted to dynamically assess the joint.

The TFCC is probed.To test the integrity of the foveal attachment of the TFCC the probe is placed in the dorsal sulcus and hooked beneath the edge of the TFCC. When lifted this should be stable, however if the foveal attachment is unstable then the disc will be lifted up a produce a positive ‘ghost’ sign.
1 – TFCC

The probe is then slid along the TFCC disc to its radial attachment on the distal edge of the sigmoid fossa. This is easily palpated as the springy TFCC disc changes to a hard bony edge.
If a hole is present in the disc the hook can be used to probe and elevate the edges. If a large defect is seen then the probe can be used to lift the TFCC and the scope advanced to see the ulna head (accentuated if supination and pronation of the forearm performed) and the foveal attachment of the TFCC in the far ulnar side.

The probe is then place to stress the volar and dorsal attachments of the TFCC. If there is a large central perforation then this stressing of the doral and volar radio-ulnar ligaments can be performed through the defect.

The SLIL is probed.Once the ulnar wrist inspection is complete the probe can be used with examine the central structures more easily.
The SLIL ligament can be probed proximaly (here revealing a baggy ligament and perforation).

Here the dorsal ligament is clearly torn.
For a view of the Luno-triquetral ligament from the radio-carpal joint the scope will need to be inserted into the 6R portal and if required a probe inserted through the 4-5 RC portal which allows the easiest assessment of the joint and ligament.
With the scope in the 6R portal the Piso-triquetral joint can often be seen as there is a variable defect in the joint which can communicate with the RC joint.

The RMC portal is made.The RMC portal is then located and created as described earlier.
This joint is often tighter then the RC joint. The clip will need to be aimed down 30 degrees and slightly ulnarward when inserted to accommodate the steeper joint surface of the distal lunate and avoid the scaphoid radially.

The camera is inserted into the RMC portal.The trochar and camera are then inserted and set initially with the buttons up and light lead to 6-o-clock.

The joint is mid carpal joint is assessed.The initial view from the RMC portal.
The joint is tighter and more shallow then the RC joint and the surgeon, having entered the joint correctly aiming 30-45 degree proximaly, needs to be careful not to drop their hand when viewing the screen as this will lean the scope on the proximal capitate cartilage causing trauma and making movement around the joint more difficult.
1 – Capitate
2 – Scaphoid
3 – Lunate

The radial aspect of the joint is inspected first and as the scope is slide up the radial joint the scaphoid can be viewed for any wear or fracture/non-union lines. The view may be improved by rotating the light source into a 3-o-clock position (for a right wrist).
1 – Trapezoid
2 – Scaphoid
3 – Capitate

Further up the radial joint the STT joint can be seen and reviewed for joint wear.
1 – Trapezoid
2 – Trapezium
3 – Scaphoid

Once the radial aspect of the mid-carpal joint has been viewed the scope is brought back to its original entry point and the light source rotated to the 9-o-clock position (for a right wrist) and the scope is aimed ulnaward.
The view now seen is shown:
1- Lunate
2- Volar capsule
3 – Hamate
4 – Triquetrum

A needle is placed in at the UMC portal site viewed on the camera in the joint.With the scope aimed ulnaward a 16 gauge needle is inserted to the UMC portal as previously described. As with the RMC entry this is aims 30-45 degrees down and slightly radial to triangulate with the scope.

The needle seen through the UMC portal.
An 11 blade is used to make the skin incision.

The UMC portal is made.An artery clip is then passed into the joint and opened horizontally for 3 seconds.

A probe is inserted into the UMC portal.The trochar stylus and then hooked probe are then inserted sequentially into the UMC portal.

The probe is used to assess the integrity of the LTIL and SLIL. Normal joints will not gap or step however a pseudo step can often be seen at the LT articulation with a type 2 lunate as the second articular surface which engages with the hamate slopes making the LT joint looked stepped.
The 2 joints are assessed using the Geissler classification –
Grade 1 – Attenuation or haemorrhage of ligament seen form RC joint
Grade 2 – Step seen in the MC joint
Grade 3 – The probe can be passed between the bones
Grade 4 – The scope can be passed through the bones – ‘Drive through sign’
The joints are best tested with the probe (or scope for a grade 4) in the portal directly in line with the joint.

With the scope in the RMC and the probe in the UMC the LTIL its tested.
The probe passed between these bones – Grade 3 (when the scope was passed into the UMC portal it could not be pushed between the bones)
1 – Lunate
2 – Triquetrum

With the scope in the RMC and the probe in the UMC the SLIL its tested.
The probe passed between these bones – Grade 3 (when the scope was pressed onto the joint it could not be pushed between the bones).
1 – Scaphoid
2 – Lunate

The volar ligaments of the midcarpal joint can also be seen and probed.
1 – Fibres of the ulno-capitate volar ligament
2 – Lunate

To complete the review of the midcarpal joint the scope is inserted into the UMC portal and the porbe into the RMC.
At this point with the light lead rotated to 9-o-clock (for a right wrist) the helicoid articulation of the Hamo-triquetral joint can be seen.
1 – Hamate
2 – Triquetrum

The volar ligaments of the midcarpal joint can also be seen and with the probe in the RMC portal they can be probed and assessed.
1 – Scaphoid
2 – Fibres of the RSC ligament
3 – Capitate
The diagnostic arthroscopy is then complete.

The wounds are closed with 1/2 inch steristrips and an adherent dressing is applied. The hand take off traction.
Local anaesthetic can be injected into the joint if a regional block has not been performed.
DO NOT release the tourniquet until the finger traps have been taken off as the re-perfusion swelling can make them more difficult to remove.

The wrist is then placed into a backslab or plaster of Paris for 1 week.

The post operative plan for patients undergoing a diagnostic wrist arthroscopy will vary greatly depending on the diagnosis discovered and treatment plan.
In the initial post operative phase the patient is in a plaster cast for 1 week and then the wounds are reviewed and physiotherapy can begin to mobilise the patient. A splint may be provided for comfort and then the specific regimen related to diagnosis or plan for a subsequent surgery can be carried out.
Complications –
Iatrogenic cartilage damage, tendon injury, nerve injury (PIN – 4-5 RC portal, dorsal sensory ulnar branch – 6U portal), infection, CRPS, failure of diagnosis or procedure if the wrist is very scarred or tight and post operative stiffness.
Rates of complication can be seen in the Results section literature.


Leclercq C1, Mathoulin C1; Members of EWAS.
Complications of Wrist Arthroscopy: A multicenter study based on 10,107 arthroscopies.
J Wrist Surg. 2016 Nov;5(4):320-326. Epub 2016 May 17.
In summary the data was collected using questionnaires from 36 centres. They noted a 6% complication rate. 5% serious 1% minor. This included a failure to achieve procedure 1.16%, nerve lesion 1.17%, iatrogenic cartilage lesion 0.5%, CRPS 0.5%. Wrist stiffness, hematomas and tendon injury were less common. Those surgeons performing less than 25 arthroscopies a year were seen to have a significant increased complication rate.
Complications of wrist arthroscopy
Arthroscopy. 2012 Jun;28(6):855-9. doi: 10.1016/j.arthro.2012.01.008. Epub 2012 Apr 6.

Leclercq C1, Mathoulin C1; Members of EWAS.
Complications of Wrist Arthroscopy: A multicenter study based on 10,107 arthroscopies.
J Wrist Surg. 2016 Nov;5(4):320-326. Epub 2016 May 17.
In summary the data was collected using questionnaires from 36 centres. They noted a 6% complication rate. 5% serious 1% minor. This included a failure to achieve procedure 1.16%, nerve lesion 1.17%, iatrogenic cartilage lesion 0.5%, CRPS 0.5%. Wrist stiffness, hematomas and tendon injury were less common. Those surgeons performing less than 25 arthroscopies a year were seen to have a significant increased complication rate.
These cases were not all diagnostic scopes and more complex procedures were performed in many cases.
Free link to paper https://www.ncbi.nlm.nih.gov/pmc/articles/PMC5074840/

Ahsan ZS1, Yao J.
In summary this was a systematic review of 11 papers 1994-2010. A complication rate of 4.7% was seen. Complications included nerve injury, tendon injury and infection.


Reference

  • orthoracle.com
Dark mode powered by Night Eye