
Professional Guidelines Included
Learn the Distal radial fracture: Dorsal plating with Depuy/Synthes 24mm VA locking radial column plate assisted by wrist arthroscopy using Acumed ARC tower surgical technique with step by step instructions on OrthOracle. Our e-learning platform contains high resolution images and a certified CME of the Distal radial fracture: Dorsal plating with Depuy/Synthes 24mm VA locking radial column plate assisted by wrist arthroscopy using Acumed ARC tower surgical procedure.
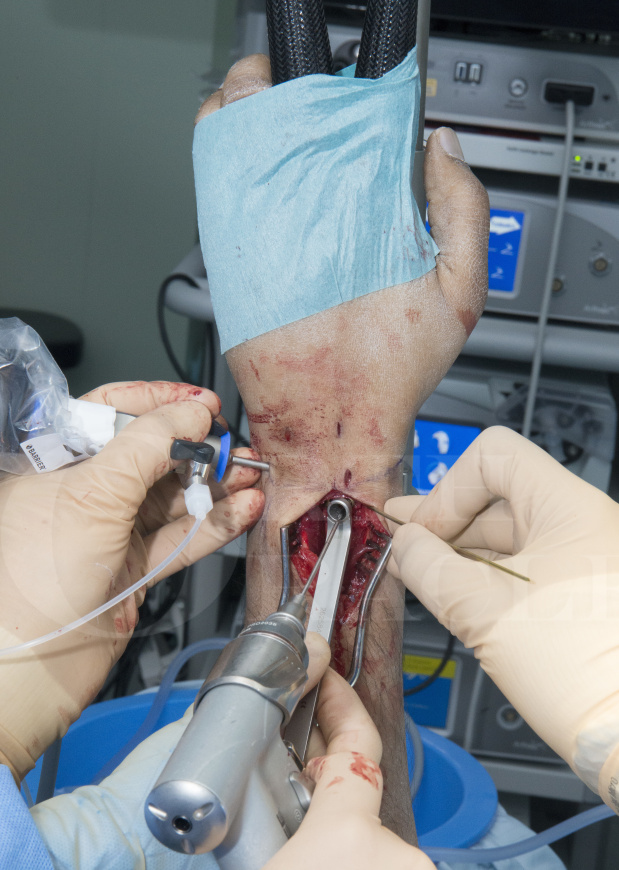
This is a detailed step by step instruction through a arthroscopic assisted dorsal plating of a distal radius.
The operation is performed to restore the bone anatomy of the distal radius following a wrist fracture. Specific attention is paid to the congruency of the distal radius articular surface viewed by the arthroscopy.
Adding an arthroscopy to a plating of a distal radius is only necessary for intra-articular fractures. It could be argued that all intra-articular fractures would benefit from an addition of arthroscopy to check joint congruence, however most intra-articular wrist fixation takes place without arthroscopy. For those surgeons who routinely perform arthroscopy of the wrist, its addition to a plating of a distal radius can be valuable, particularly in the presence of die punch or stepped fractures not easily seen or reduced by other means.
The joint fragments can be reduced using probes or wires through the fracture site once the wrist is opened and the reduction checked by the arthroscopy or the fragments may be reduced using the probe through the arthroscopy portals and position checked once the plate(s) is applied.
It is sometimes unnerving how the radiographic images taken intra-operatively can appear well reduced and only when the joint is directly viewed through an arthroscope is it noted how much of an articular step remains.
As far back as 1999 Doi et al (1) showed of the 82 patients treated there was a decreased incidence of mid term arthritis in the arthroscopic assisted fixation group rather than those with no arthroscopy, 47% versus 58%. Abe et al (2) revealed why this may be the case as they showed that in 35% of patients who appeared to have an anatomical reduction on fluoroscopy had a step-off or gap in the articular surface >2mm found at arthroscopy.
Other advantages of arthroscopic assisted distal radius fixation are to discover any concomitant ligament or cartilage injuries and any screw penetration.
Addition of an arthroscopy does prolong the procedure aiming to improve joint congruence and reduce later arthritic changes. The procedure take from 90-150 mins depending on the complexity of the fracture and the delay between injury and operation.
The operation is performed as a daycase procedure and the patient is placed in cast for 4-6 weeks following the procedure to start focussed rehabilitation once casting is complete.
Patients often return to light work at 8 weeks, heavy work at 3 months and continue to strength and improve up to a year post-operation.
The plating system used in this particular case was the 2.4mm Variable angle LCP Dorsal Distal radius plates from DePuy Synthes. The features of the plates are an array of short and long anatomically contoured options including a radial column plate to place on the Radial styloid. Variable angle holes allowing a 15 degree arc in each direction (which is easily drilled with a specially designed variable angle drill guide) for more accurate screw placement in relation to the fracture fragments. They are low profile and have undercut notches to allow bending. They have k-wire holes to allow temporary plate placement and an oval non-locking hole for the first shaft screw to allow minor adjustments.
This operation should be read after first studying and understanding the wrist arthroscopy technique on OrthOracle https://www.orthoracle.com/library/diagnostic-wrist-arthroscopy-acumed-arc-tower/
Doi K, Hatturi T, Otusaka K, et al. Intraarticular fractures of the distal aspect of the radius arthroscopically assisted reduction comparedwith open reduction and internal fixation. J Bone Joint Surg1999;81A:1093–1110.
Abe Y, Yoshida K, Tominaga Y. Less invasive surgery with wrist arthroscopy for distal radius fracture. J Orthop Sci 2013;18:398–404.
Author: Mr Mark Brewster FRCS (Tr & Orth).
Institution: The Royal Orthopaedic Hospital, Birmingham, UK.

Indications.
This procedure is indicated for a intra-articular distal radius fracture which has been chosen to undergo operative fixation.
It is used in intra-articular fractures which, based on a CT scan, are anticipated to pose a challenge when trying to reduce the distal radial articular surface due to a stepped or die punch pattern of fracture.
Arthroscopy is used as an adjunct to plating of the distal radius.
The decision of whether to plate a distal intra-articular fracture will depend on patient factors and fracture pattern factors.
Patient factors
Elderly patient – may have poor bone stock and if they have a very comminuted fracture or low function may benefit from a bridging plate or external fixator to achieve an indirect reduction instead.
Poly-trauma patient – a short duration operation may often be required primarily in these patients. Bridging plate or external fiaxtor
Large soft tissue defect – this patient will benefit from an external fixator to reduce the risk of infection of exposed plates if primary skin closure is not achievable.
Fracture factors
Comminution – if very severally comminuted a bridging plate or external fixator may be employed to achieve an indirect reduction.
Open fracture – as above with tissue defect.
Simple and reducible – if it is a simple intra-articular fracture reducible closed then k-wires rather than plate fixation may be used as per the DRAFFT trial.
Symptoms.
The operation is for acute distal radius fracture which have not started to heal and therefore allow easy mobilisation of the fragments. The can be anytime up to 2 weeks but is simpler the sooner the operation is undertaken.
Pain and swelling will be present and possibly tingling if the swelling or fracture displacement is causing nerve compression.
Examination.
In young patients particularly, these injuries are high energy and therefore an ATLS approach needs to be take to the examination in particular assessing the elbow and hand for concomitant injuries.
Specific to the wrist fracture the skin needs to be examined for any breech which would make this an open fracture. The hands neuro-vascular status needs to be examined and recorded.
Capillary refill should be < 2 seconds, any tingling or numbest should be assessed in the median, ulnar and radial nerves with the median being most likely to be affected.
Movement of the fingers and thumb can be assessed however this is often difficult due pain related to the fracture.
If a high energy injury then an awarenesses of the signs of compartment syndrome of the forearm needs to be present.
These would be as severe pain beyond that expected for the injury, increased pain on finger extension and a tight forearm. Neuro-vascular symptoms are a very late sign in compartment syndrome and should not be relied on to make the diagnosis.
Investigations.
Plain X-rays
As part of the diagnosis the patient will have undergone a PA and lateral radiograph. If they have had a wrist manipulation in the emergency department and a plaster cast replied then a repeat radiograph in the cast is essential.
CT scan
For intra-articular fractures a CT scan is strongly advised to appreciate the anatomy of the fracture in particular the displacement of the dorsal ulnar corner of the distal radius. This fragment is difficult to see on plain radiographs and affects both the radoiocarpal and distal radio-ulnar joints.
Non operative treatments.
The fractures which are appropriate for arthroscopic assisted fixation are not appropriate for non-operative treatment unless the patient is so unwell that an operation would be life threatening.
Alternative operative treatments.
As discussed there are alternative treatments such as external fixator or bridging plate in certain circumstances related to patient and fracture factors which may be more appropriate than plate fixation.
The true alternative with the same fracture in the same patient is to perform the plating without arthroscopic assistance which is the most frequent way these fractures are performed. This is likely to be a combination of a resource and skill issues with not everyone performing wrist fracture surgery also able to perform wrist arthroscopy.
Contra-indications.
Absolute
-A patient who cannot undergo a 2 hour operation due to their current health status.
– A surgeon who does not have the arthroscopic skills to perform the procedure.

The operative is performed under regional or general anaesthetic.
In addition to standard surgical instruments, equipment required will be an Esmarch bandage, arthroscopy tower, and set (camera, trocar, obturator, probe), 50ml syringe and tube to deliver saline to trocar, fine suction tube, Depuy Synthes 2.4mm VA dorsal plating system, an image intensifier and a plaster cast.


The procedures are usually performed as a day case under axillary block or general anaesthetic.
It is essential to provide adequate analgesia – paracetamol, codeine and oral morphine, and advise patients to start taking this pain relief sooner rather than later to avoid the axillary block wearing off completely before the analgesia has had time to work. We advise patients to take the paracetamol and codeine before bedtime that night, even if their arm is still numb, and have their morphine by their bed for use during the night or first thing in the morning. In addition we provide anti-emetics and laxatives to counteract the side effects of the opiates.
In addition to analgesia the patient receives a Bradford sling to elevate their hand and advice to keep their hand elevated, start moving their fingers as soon as possible and to expect this to be a painful operation despite the analgesia. Often patients will sleep the first night or two in a chair which makes arm elevation easier and limits are movement more.
Following discharge the patient attends a clinic within a week to change the plaster cast, which often has become tight and then loose again following the initial post-operative swelling.
If still very swollen they are placed back into a half cast and seen the following week for a full cast. If the swelling is minimal the may receive a full cast at this point. The are also seen by the hand therapists at this point to encourage finger movements.
At 6 weeks the cast is removed and wrist x-rayed.
If all is well, a removable splint is provided for comfort and certain lifting tasks and the hand therapist will start wrist mobilisation encouraging the removal of the splint the majority of the time.
Patients often return to light work at 8 weeks, heavy work at 3 months and continue to strengthen and improve their range of movement up to a year post-operation.

The results following distal radial fractures is dependant on many factors – associated injuries (particularly to the ulnar side of the wrist), pre-morbid state, adequacy of reduction of distal radial alignment and the articular surface, surrounding soft tissue injury and patient rehabilitation.
Complications are related to the operative technique and the severity of the injury.
Complications include infection, stiffness, persisting pain, chronic regional pain syndrome, neuro-vascular injury, scar tenderness, tendon injury, malunion, post-traumatic arthritis, secondary operation for plate removal and decreased grip strength.
The frequency of complications related to the arthroscopic part of the procedure are greater the less experienced the surgeon. The complications are noted in the results section of the diagnostic wrist arthroscopy.
Complications of general or regional anaesthetic also should be discussed with the patient.
Below are some papers which will enhance your knowledge on the topic and may aid your future decision making for such patients.
Treatment of intra-articular fracture of distal radius fractures with fluoroscopic only or combined with arthroscopic control: A prospective tomodensitometric comparative study of 40 patients.
Burnier M1, Le Chatelier Riquier M1, Herzberg G2. Orthop Traumatol Surg Res. 2018 Feb;104(1):89-93.
In this paper 40 patients of similar fracture and patient characteristics were assessed prospectively with CT scan. They were assigned to either fluoroscopic or arthroscopic assisted reduction of their distal radius fracture and then reviewed with a CT again post-operatively to assess joint congruency.
The steps and gaps were not significantly different preoperatively in the 2 groups however there was a statistically significant improvement in both the radoiocarpal and DRUJ articular surface in the arthroscopic compared with the fluoroscopic reduced patients. This included a significantly greater % of patients with a <1mm gap or step in the arthroscopic group which was noted as being the cut off associated with future joint arthritis.
Arthroscopic-Assisted Reduction of Intra-articular Distal Radius Fracture.
Abe Y, Fujii K. Hand Clin. 2017 Nov;33(4):659-668.
The authors treated 248 consecutive distal radius fractures (the vast majority C1 & C3 types) with plating and arthroscopic assistance. In their study they noted advantages of arthroscopy which included – an acceptable reduction on fluoroscopy did then not correlate well with an acceptable joint reduction when viewed with arthroscopy (21% patients still had >2mm steps in articular surface despite looking acceptable on fluoroscopy), loose bodies not seen on fluoroscopy or CT scan were seen and dealt with arthroscopically, intra-articular screw protrusions were seen and could be resited, associated ligament injuries could be diagnoses and treated.
199 of these patients were followed up >1 year and 76% were graded as excellent and 22% good on the Mayo Modified Wrist Score. Complications were 5 (2.5%) gross displacements of the distal fragment, 2 (1%) extensor pollicis longus tendon ruptures, and 1 (0.5%) complex regional pain syndrome.
For more of an overview on wrist arthroscopy in conduction with distal radius fracture fixation a systematic review by can be read.
F. Smeraglia, A. Del Buono & N. Maffulli. Wrist arthroscopy in the management of articular distal radius fractures. British Medical Bulletin, Volume 119, Issue 1, September 2016, Pages 157–165.


