///

Distal Radial fracture fixation with dorsal approach and Synthes 2.4mm variable angle plating system

Professional Guidelines Included
Learn the Distal Radial fracture fixation with dorsal approach and Synthes 24mm variable angle plating system surgical technique with step by step instructions on OrthOracle. Our e-learning platform contains high resolution images and a certified CME of the Distal Radial fracture fixation with dorsal approach and Synthes 24mm variable angle plating system surgical procedure.
This is a detailed step by step instruction through fragment specific dorsal plating of a distal radius fracture using Depuy SynthesTM 2.4mm variable angle plating system.
This is a procedure undertaken for complex comminuted intra-articular distal radius fractures. It allows for fragment specific fixation of the fracture and can be combined with arthroscopic assessment if necessary.
The post-operative regimen will depend on the complexity of the fracture and the confidence of the surgeon in the hold of the fixation.
Commonly the patient is placed into plaster cast for 7-10 days for comfort and to allow post-operative swelling to settle and then mobilisation begins with the hand therapy team with a Futuro wrist splint to be used for comfort at the patients discretion.
Heavy loading of the wrist and aggressive passive exercises are not started before 6 weeks post-operatively.

Indications
Dorsal plating of the distal radius is used for comminuted intra-articular fractures which benefit from fragment specific fixation and are often either too distal or too comminuted to hold easily with the standard volar plate.
Dorsal plating is less frequently performed for distal radius fractures by surgeons without a specialist interest in hand surgery and therefore an appropriate knowledge and ability in performing the procedure is also required in addition to the surgical indications.
Most complex distal radius fractures are difficult to classify however this technique is usually used when there are multiple fragments including radial styloid, volar and dorsal lunate fossae and with comminution or depression of smaller areas within these main 3 fragments.
As the majority of these fractures are dorsally displaced on impact, the dorsal plates provide a buttress effect to the fragments in addition to being able to support the articular fragments with the use of simple locking screws and variable angle screws where required.
Symptoms
As this is a post traumatic procedure the symptoms are of pain and swelling of an acute fracture.
Surgeons also need to be aware of, and examine for, the presence of acute carpal tunnel syndrome which may need simultaneous decompression.
Concomitant injuries may also be assessed for in high energy injuries such as – scaphoid fractures and elbow injuries however the overriding pain of the distal radius fracture may make clinical assessment of other hand injuries difficult.
Examination
Examination of a distal radius fracture patient will depend on the mechanism of injury and if necessary a full Advanced Trauma Life Support (ATLS) approach should be undertaken to preserve life and avoid missing other other injuries.
In particular associated injuries are neck, ipsilateral brachial plexus, shoulder, elbow, scaphoid and finger fractures.
Patients with complex distal radius fractures usually have marked swelling , pain and a clear deformity of their wrist.
With focus on the wrist, the patient should be examined for puncture wounds, which would make this an open fracture and increase the urgency of the surgery and for the neuro-vascular status of the limb, in particular median nerve sensation due to the risk of acute carpal tunnel syndrome.
Similar examinations of neurological status is required post-manipulation if this is undertaken in the acute setting.
Following fixation of the distal radius, an intra-operative assessment of the DRUJ is also required (specifics of this will be discussed later)
Investigations
If this is considered an isolated wrist injury investigations will include plain PA and lateral radiographs of the wrist to assess the fracture. Appropriate investigations such as bloods and ECG to plan for surgery if required. If the fracture is complex and is of a nature for which dorsal plating would be appropriate then a CT scan is also advised to aid pre-operative planning.
Fluoroscopy is used throughout the operative procedure.
Alternative Operative Management
There are a number of solutions to treating a complex distal radius fracture and these vary depending on the health status of the patient (most commonly restricted in polytrauma patients), the fracture pattern, soft tissue injuries and the skills of the surgeon.
Treatment options include – casting, percuateous wiring, volar plating, dorsal plating, bridge plating and external fixation.
Each fracture and patient must be assessed on an individual basis, however a treatment algorithm is more complete when a surgeon has all the listed skills in their armamentarium.
Non-operative treatment
Non-operative treatment of complex intra-articular fractures is rare due to the co-morbidities associated with the mal-unions expected (pain, dysfunction, median nerve irritation) however in the very elderly, unwell or poly-trauma patients there may be no safe opportunity to offer surgical treatment and a period of casting is required instead.
Contra-indications
The absolute contra-indication to this surgery is if the patient is not fit enough to undergo surgery.
Relative contra-indications to dorsal plating include marked contamination of the wound or soft tissue loss, a volar wound which can be utilised to plate the wrist from a volar aspect (to avoid opening both sides of the wrist), fracture patterns where dorsal plating is not a logical solution (volar Barton type fracture) and a lack of surgical experience to tackle dorsal plating.


Pre-operative Preparations and Equipment
The operation can be performed under general or regional anaesthetic.
As the duration of surgery can be up to 2 hours, a sterile Esmarch is used to exsanguinate the limb once the skin marking is completed to reduce tourniquet time. Access to a sterile forearm tourniquet may useful if the patient under regional anaesthetic starts to struggle with tourniquet pain. Tourniquet is set to 250mmHg.
The patient is supine with the arm on an arm board and due to the tendency for the forearm to supinate, the surgeon is best seated on the ‘head’ side of the table.
Equipment – Slim tool such as Watson Cheyne dissector to pass through the fracture and elevate articular fragments, a sharp curved periosteal elevator, DePuy Synthes 2.4mm Variable angle dorsal plating system, k-wires, image intensifier, plaster cast.
A single dose of antibiotics are given pre-operatively.

The distal radius and ulna and incision site is marked.
Once the anaesthesia of the limb is tested the wrist is marked. This is a longitudinal incision just ulnar to Lister’s tubercle. The distal extent is to the level of the mid-carpal joint and the proximal extent will depend on the metaphyseal comminution of the fracture. Have a low threshold for extending the approach if it appears too limited.
Once this preparation is complete the arm is exsanguinated with a sterile Esmarch bandage and tourniquet inflated to 250mmHg
The arm is positioned in pronation. Due to the tendency of the arm to supinate the surgeon is best seated at the head end and the Image intensifier entering from the foot end of the patient when required

Sharp dissection through skin and down to extensor retinaculum (ER) is performed.As the incision is in the midline there are rarely any large cutaneous nerve branches seen although a number of small vessels perforate the ER which are best coagulated. The fat, veins and superficial nerves are elevated as one.
The upper forceps are shown pointing to a branch of the Superficial radial nerve.
The lower pair of forceps are shown pointing to Lister’s tubercle beneath the ER.

The skin is bluntly mobilised at the level of the ER radially to the 1st extensor compartment (EC).In the majority of dorsal wrist plating cases, the radial styloid is plated with a contoured radial column plate.
It can be seen on the image the extent of the radial dissection required to gain access to the site for the plate placement.


A cut directly onto the bony prominence of Lister’s tubercle to open the radial side of the 3rd EC is performed.This leaves thick periosteum fibers within the retinacular flap allowing it to be reattached more easily during closure.
Many surgeons will advocate continuing this plane sub-periosteally across the dorsal radius however I have found in comminuted wrist fractures that this may leave many small free fragments with no soft tissue attachment.

The Extensor Pollicis Longus (EPL) tendon of the 3rd EC is exposed.

The remaining ER is divided distally and proximally over the EPL.Use tenotomy scissors with the blades very slightly open either side of the ER. Open along the 3rd compartment by pushing distally and proximally as shown on the image (don’t close the scissors and cut, just push firmly).

The side of the 4th EC is opened.The same technique is used to open the 4th EC accessing it at its proximal radial border where the tendons of Extensor Digitorum Communis (EDC) are clearly visible through the thin film of synovium.

The extensors of the 4th EC are now revealed and the EPL is retracted radially. The ER flap is held aside with the forceps.

The Posterior interosseous nerve (PIN) and artery (PIA) indicated by the scissors are divided.The self retaining retractor (large West or small Travers) is placed with the larger side ulnarward to hold the extensors of the 4th EC and the small side radial anchored on the tendons of the 2nd EC while holding the EPL radially.

Radial sided anatomy:
1 – Tendons of 1st EC
2 – Tendons of the 2nd EC
3- The rough location of the tip of the radial sytloid (locate by palpation)

Divide the fascia over the 1st EC tendons proximally and place a self retainer between the 1st and 2nd EC to expose the radial styloid.With the EPL now under the ulnar limb of the self retainer the fracture is exposed on its radial aspect.
To access the radial side of the fracture line and prepare the area for a radial column plate, the radial aspect of the 2nd EC and the ulnar side of the 1st extensor compartment are elevated subperiosteally as necessary and there periosteum over the radius is split down to the bone revealing the fracture.

Debride the fracture edges and reduce the radial styloid.If there is difficulty in reducing the styloid fragment a few tips can make this easier:
1 -Make sure the periosteum is clear from the edges of the fracture
2- Sub-periosteally elevate the Brachioradialis tendon of the styloid
3- Use a Hohmann retractor down the the radial side as a retractor and reduction tool
4- Hold the styloid in place temporarily with a K-wire
Fracture reduction usually required a reversal of the deforming forces therefore – traction, ulnar deviation, pronation and flexion.

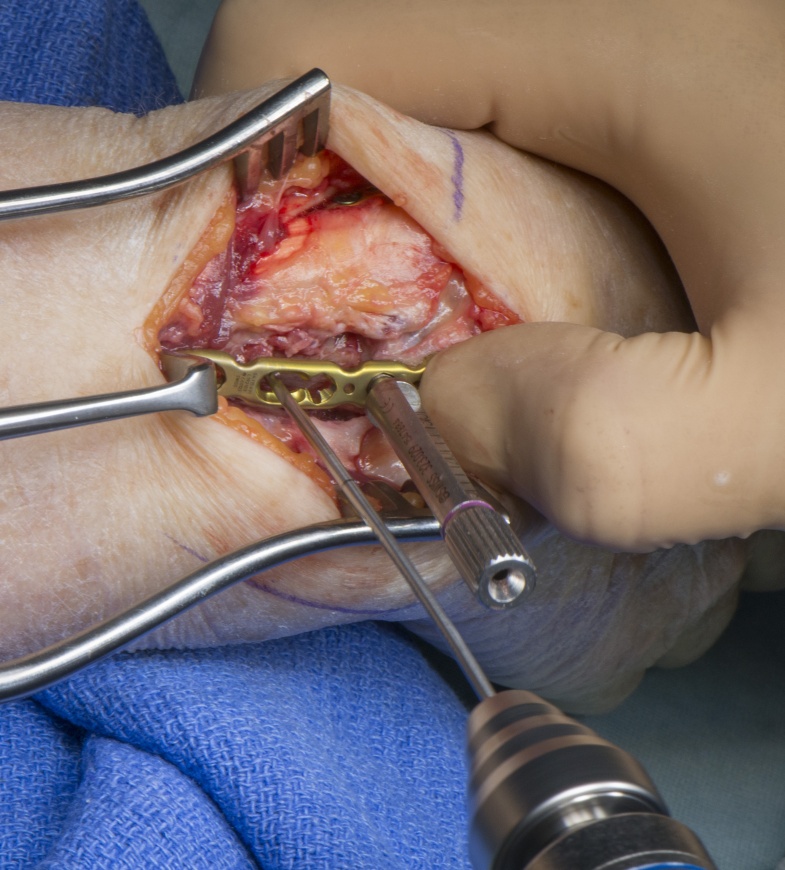
The pre-contoured Radial column plate is placed over the styloid between the 1st and 2nd EC.The reduction and plaste position is checked on the Image Intensifier (II).
A screw-in locking drill guide can be used as a handle on the plate to help with positioning.

A non-locking 2.4mm screw is inserted into the sliding/oval hole.Alternatively, if unsure about the accuracy of the plates position it can be temporarily held with k-wires provided on the set through the proximal k-wire holes.
The wrist is re-imaged with the II to check plate placement and adjustments can then be made by sliding the plate over the screw in the oval hole as necessary.

The GREEN locking screws are then inserted to hold the fracture.It must be remembered that the distal holes of this plate may require very short screws or variable angle screws to be directed proximally to avoid joint penetration.
In addition, longer screws crossing into the centre of the radius can block reduction of the more central fracture fragments and are therefore best left out until the fracture is fully reduced or until the more dorsal plate(s) is applied.

A radiograph is taken to check plate and fracture position.Intra-operative fluoroscopy with Radial column plate in situ and depressed Lunate fossae

The self retainer is relocated and the dorsal portion of the fracture exposed.The periosteum on the edges of the the fracture lines are elevated to expose the fracture and aid reduction and plate positioning.

The fracture is then reduced and check on then II.

The dorsal plate is positioned on the ulnar column of the distal radius.1 or 2 dorsal plates can then be applied to buttress the fracture and support the articular surface. The plates are precontoured but can be further contoured if required. With a number of shapes and lengths to choose from the fragments can be held even with some quite proximally fracture extension into the metaphysis.
When siting the dorsal plates, the location and depth of the sigmoid notch of the radius must be taken into account.

Once happy with the radiographs a screw is inserted in the oval non-locking hole.Again a screw-in guide can be used as a handle and the non-locking oval sliding hole is drilled first to allow minor plate adjustment under guidance from II images.

Further PA and lateral radiographs are taken now the plate is fixed.Dorsal plate placement – often on the II these plates will look very distally placed on the PA view however the lateral view will reveal the distal/proximal relationship to the bone more clearly.
The plate can be adjusted slightly by loosening the screw in the oval hole.

A locking screw is inserted proximal to the fracture to fix the rotation of the plate.Intra-articular steps can be corrected using a Watson Cheyne dissector throught the fracture to push the fragement distally and contour it to the proximal carpal row.

Intra-operative fluoroscopy is taken to show the reduction of the Lunate fossae fragment.

Distal screws are inserted to support the reduced fragments.Once happy with the reduction on the II the screw is drilled, measured and sited with the dissector still in situ to ensure no movement of the fragments.
Variable angle screws with a total arc of 30 degrees can be used to support fragment or avoid the distal radio-ulna joint.

Often the more distal holes can either be left empty as a buttress plate or be filled with PURPLE VA screws aimed proximally with the VA drill guide to avoid joint penetration.
With completion of the plating the wrist is flexed and extended and supinated and pronated to examine for fluid movement and any crepitus which may indicated joint penetration.
Final radiographs are taken and when performing both the PA and lateral images, additional views with 15 degrees of elevation can allow a clearer view across the radio-carpal joint space accounting for the radial volar tilt and radial inclination.

Final intra-operative radiographs are taken.

Intra-operative fluoroscopy final result – Lateral

The ER is closed with 3/0 vicryl.After final II images are reviewed and satisfactory the wrist is then closed.
If possible the EPL tendon is placed into the new combined 3rd and 4th compartment however due to plate positioning this may not be possible and the tendon may need to be exteriorised.

The wound is closed with interrupted 4/0 vicryl to the deep dermis and 4/0 absorbable sub-cuticular continuous suture to the skin.The sub-cuticular absorbable suture starts and ends outside the skin with bulky knots (at least 4 double throws on thin elderly skin to avoid the skin tearing an the knot being pulled beneath the skin surface) which can be trimmed or will fall off in 2-3 weeks.
Once the wound is closed an assessment of the stability of the Distal Radio-ulnar joint (DRUJ) should be undertake. If grossly stable then not further action is taken. If very unstable compared with the contra-lateral side and/or a large displaced ulnar styloid fracture is present then this may need to be addressed (see results section for paper on this topic).
The tourniquet is then released and the hand rested on the table for 5 MINUTES. This allows the initial reperfusion and swelling to occur before the wool and plaster cast is applied.

Wound dressing applied.Usually an adherent dressing is applied however in this case the skin was deemed to be thin and liable to blister therefore a non-adherent JelonetTM dressing was used with blue gauze as padding.

Wool is applied and split to allow for swelling.The wool is applied as standard for a below elbow plaster cast however the circumferential wool around the wrist is split (see image) then covered with a layer of non circumferential wool to allow for swelling and reduce painful constriction of the dressings.

A dorsal slab of plaster is then applied and held with a bandage and tape.

Pre-operative radiograph PA in cast

Pre-operative lateral radiograph in cast

Pre-operative sagittal CT showing volar and dorsal comminution

Pre-operative coronal CT showing styloid and lunate fossae fragment

Pre-operative transverse CT showing styloid and lunate fossae fragments with intact sigmoid notch as one piece

As this is a painful operation it is paramount to advise the patient that it is very painful, advise strict elevation in a sling provided and provide opiate analgesia.
We provide paracetamol, codeine and oral morphine with an antiemetic (cyclizine) and a laxative (senna). Anti-inflammatory medications are not used for the first 2 weeks.
Patients are sent home the same day and return to clinic for a wound review and cast change within the week.
The cast is usually discontinue at this point however casting time may extend depending on reliability of the patient to not weight bear with the hand and confidence of the surgeon in their fixation. Both of this aspects may cause longer casting time in elderly patients with poor bone stock and reliant on walking aids.
If the fingers are stiff at one week then a hand therapy review with the new cast or a Futuro splint in place is advised.
If the cast was removed after 1 week, the splint is used for 5 further weeks for comfort or protection but controlled wrist movements out of the splint are encouraged.
At 6 weeks PA and lateral radiographs are taken and if all is as expected then start more aggressive hand therapy for wrist movement including passive movements.
Most patients with comminuted fractures that require dorsal wrist plates will take around 6 weeks to get back to sedentary work and 3 months in manual labouring professions.

Complications of low-profile dorsal versus volar locking plates in the distal radius: a comparative study.
Yu YR1, Makhni MC, Tabrizi S, Rozental TD, Mundanthanam G, Day CS
J Hand Surg Am. 2011 Jul;36(7):1135-41. doi: 10.1016/j.jhsa.2011.04.004
In summary this study reviewed 100 patients and suggested there were not significant differences in tendon problems or plate removal between volar and dorsal plating, however there was a higher rate of neuropathic complications in volar plating.
10% of dorsal platings and 8.5% of volar plating required some metalwork removal.
Management of Intra-Articular Distal Radius Fractures: Volar or Dorsal Locking Plate-Which Has Fewer Complications?

Abe Y1, Tokunaga S2, Moriya T1.
Hand (N Y). 2017 Nov;12(6):561-567. doi: 10.1177/1558944716675129. Epub 2016 Oct 28.
In summary, of the 112 wrists plated, there was no statistically significant differences in the complications between the dorsal and volar platings. An irreducible dorsal die-punch fracture was the reason most often sited for choosing a dorsal approach to plating.
Conservative Treatment Is Sufficient for Acute Distal Radioulnar Joint Instability With Distal Radius Fracture.
Lee SK, Kim KJ, Cha YH, Choy WS.
Ann Plast Surg. 2016 Sep;77(3):297-304. doi: 10.1097/SAP.0000000000000663.
In summary, the team reviewed 157 patients in a prospective randomised control trial over 5 years of operative versus non-operative treatment for DRUJ instability recorded at the the end of a distal radius fixation. They found that those under going surgical fixations of the ulna styloid fractures or TFCC repairs fared better in their range of motion; Disabilities of the Arm, Shoulder and Hand score; modified Mayo wrist score; and grip strength at 3 months however no difference was found at final review.

Dark mode powered by Night Eye